
Pteromini
Arknabbit, and EMax pilot, asked me to make him a 3" frame that uses their 1106 motors. I get my fair share of requests, but sometimes one just arrives at the right time, when I've learned a lot of things but they haven't been applied to a particular form factor.
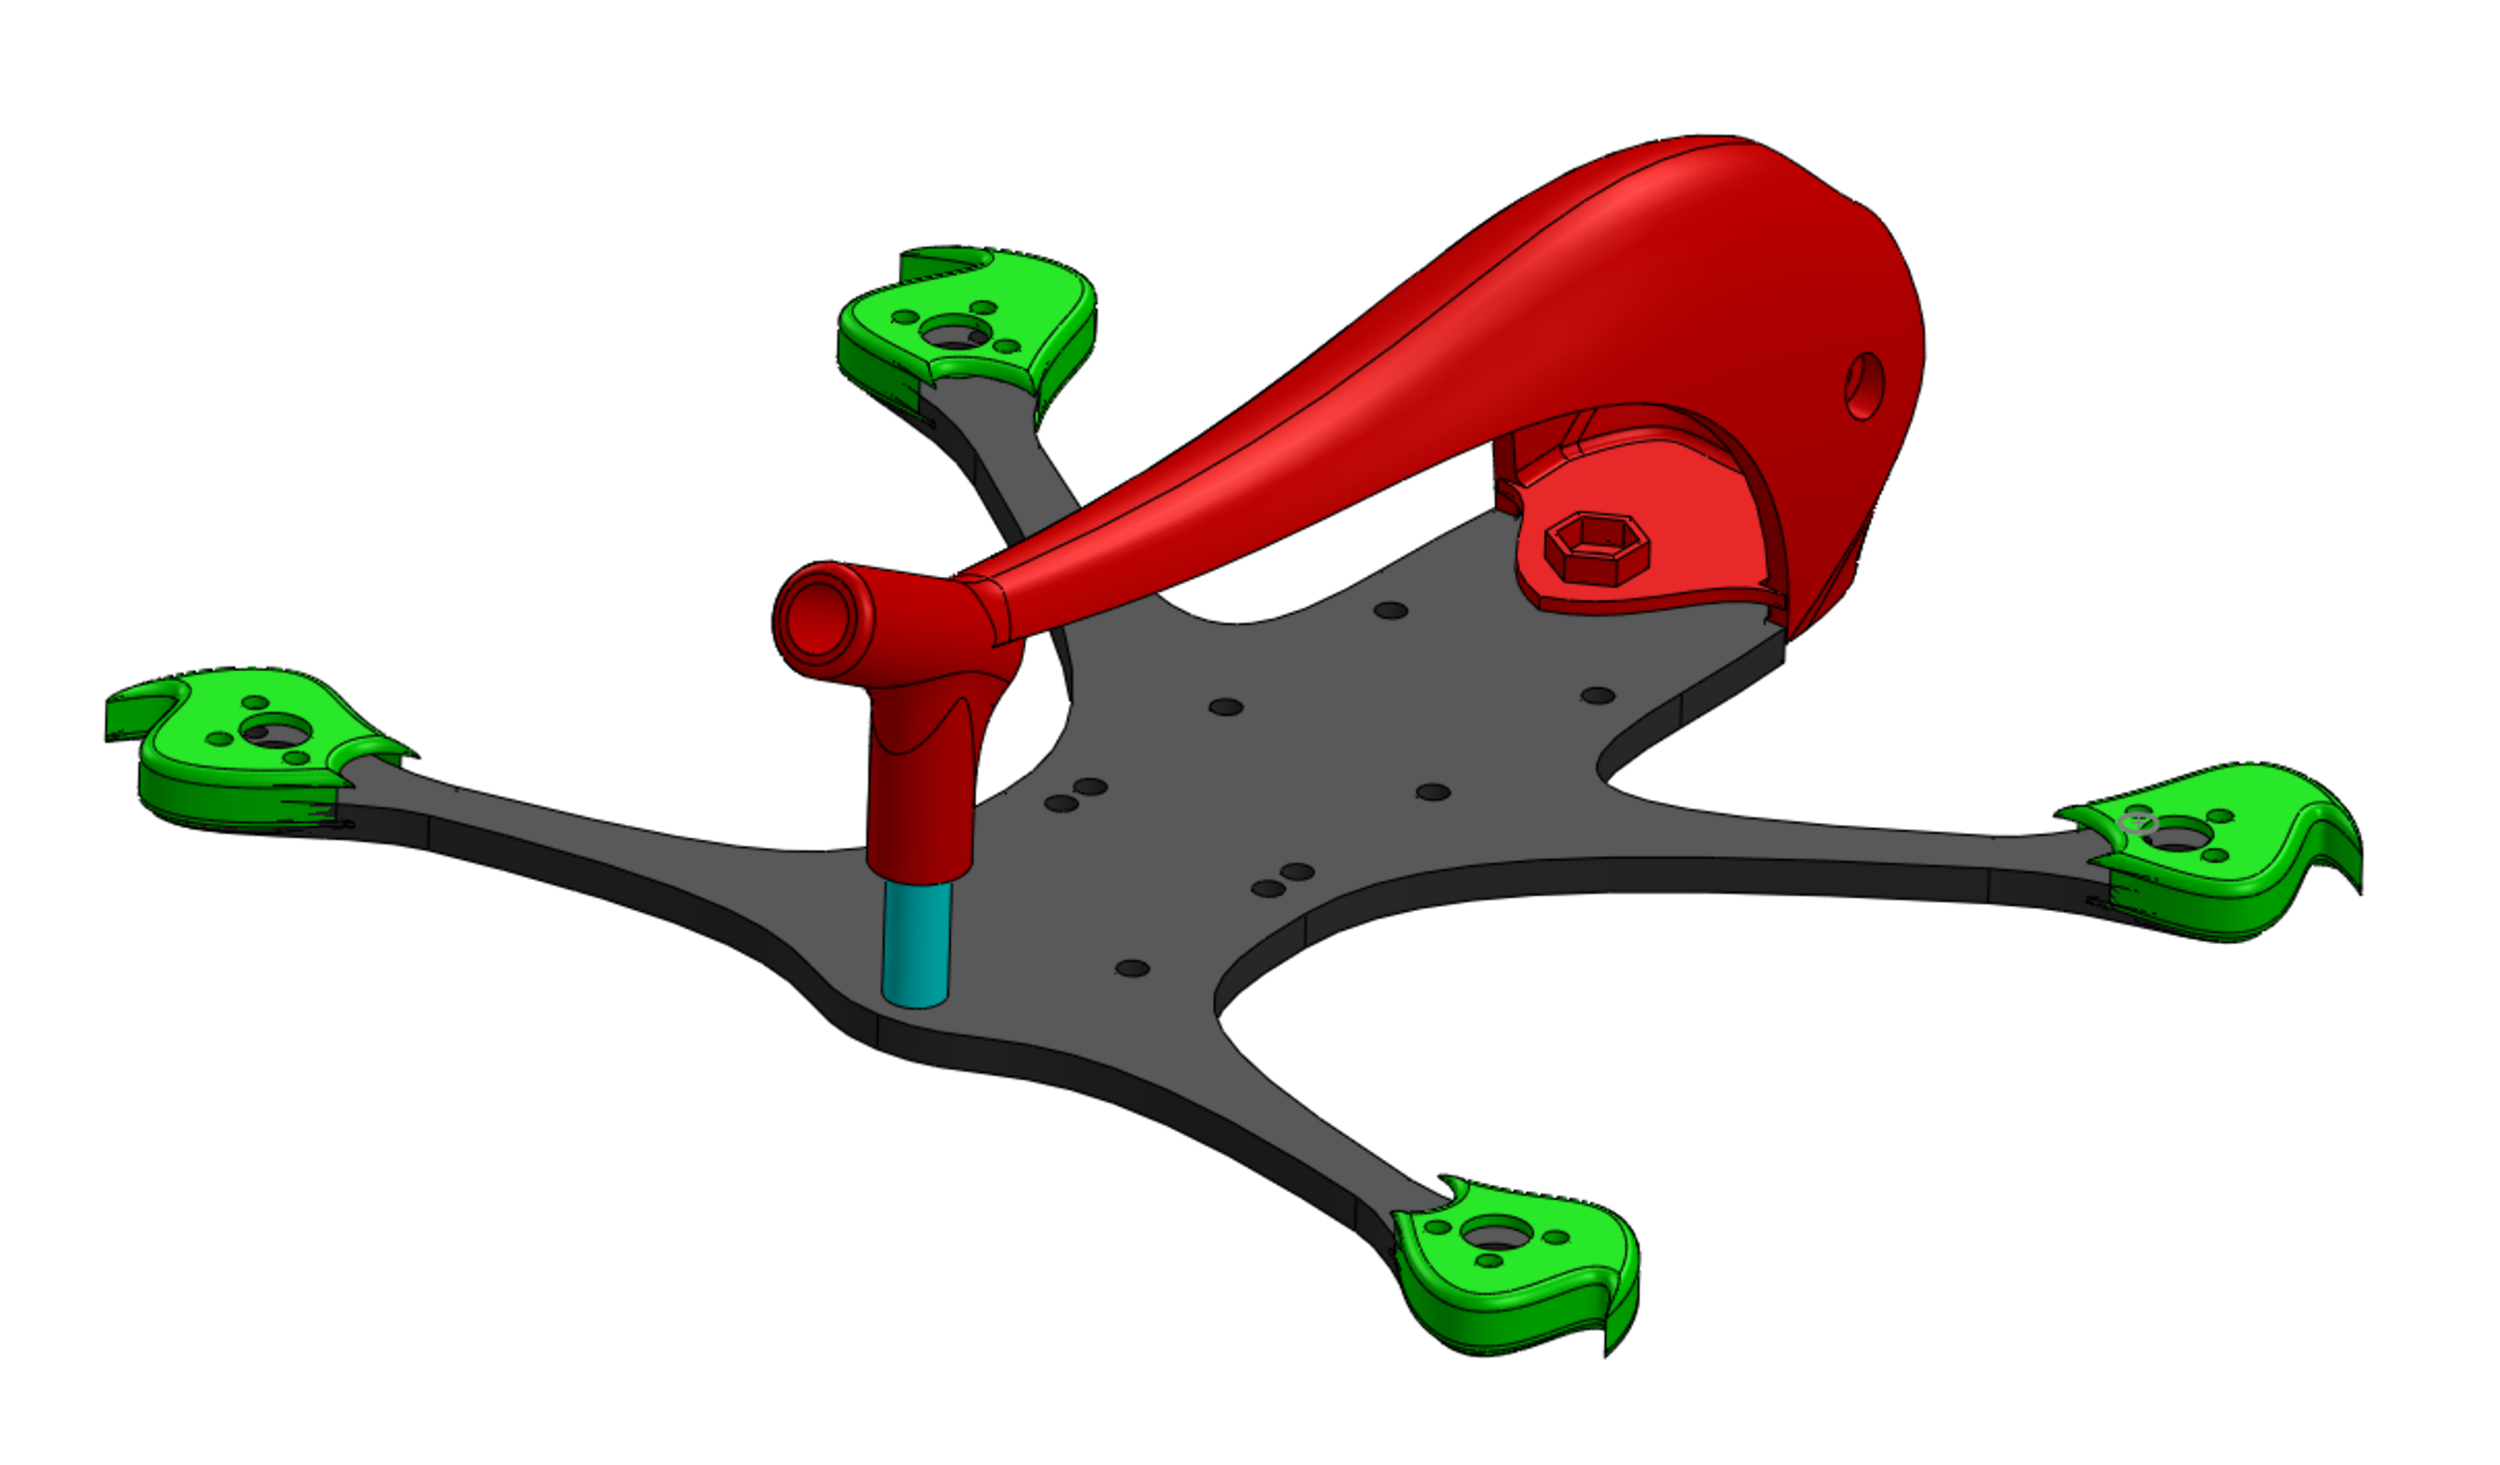
The 3d Shrieker is a cool way to make a small and light frame with no hardware at all, by printing TPU pods directly onto the carbon. I thought it'd be cool to do something like that, but with super skinny arms a la Flaco for max efficiency – the super light motors would make it easier to get away with a skinny arm frame. I laid out a stretch-x frame with arms that tapered down to 6mm at the thinnest. I gave each motor mount only three holes so I could shave a tiny bit more weight on the trailing edge of each arm. Next I started on the TPU parts. The camera pod was particularly difficult since the microcam's board is much wider than the lens barrel, and so doesn't make for a smooth transition from the lens opening to the pod itself.
I had a hard time imagining an aesthetically pleasing cam pod 'til I gave it a bit of an underbite, which made it waaay less dopey looking.

The 'non-tangent faces' idea had a mind of its own and drove the cam pod design, so I rolled with it and made a rear antenna pod with the same look. I gave both points that terminated at the same height so that the printer nozzle wouldn't linger at any one point too long.

Finally I added motor soft mounts/armguards. The whole thing was looking like a flying squirrel so I gave the armguards 'claws', which in reality are bumpers meant to flex and take the edge off hard impacts.
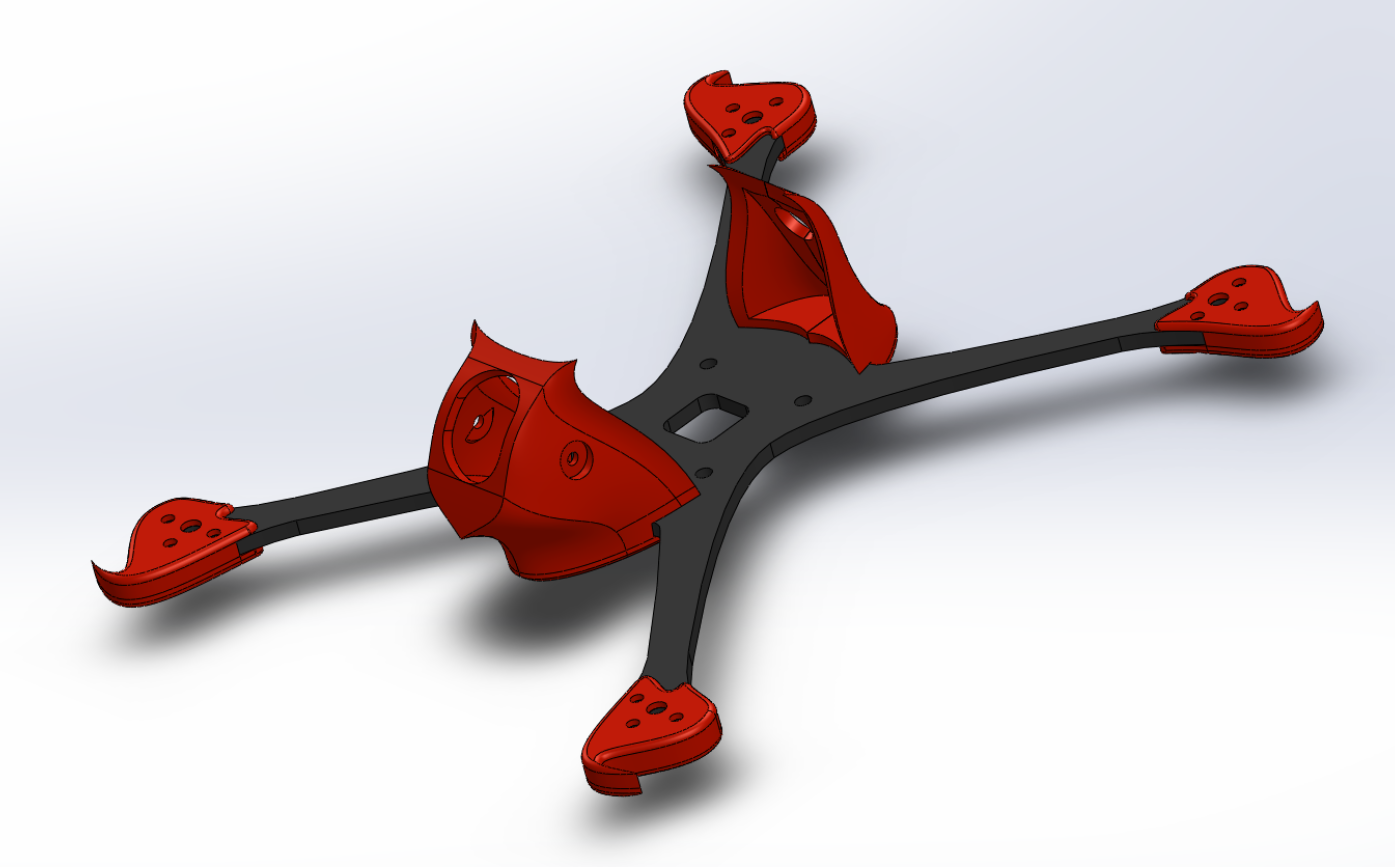

At this point I'm feeling pretty good, since it looks really cool, and every bit of its looks has a functional reason. It looked like a flying squirrel, or a Pteromyini, which led to the name 'Pteromini'. I ordered the carbon in 2.5mm and 3mm and eagerly awaited its arrival.
The carbon arrived, and the difference between the 3mm and 2.5mm plates was so minimal there was no reason to go with the 2.5m version. I printed the parts onto one fo the 3mm plates and started building.

The print gets to a certain height, a script pauses the printer, and the carbon is dropped in and the print resumed.

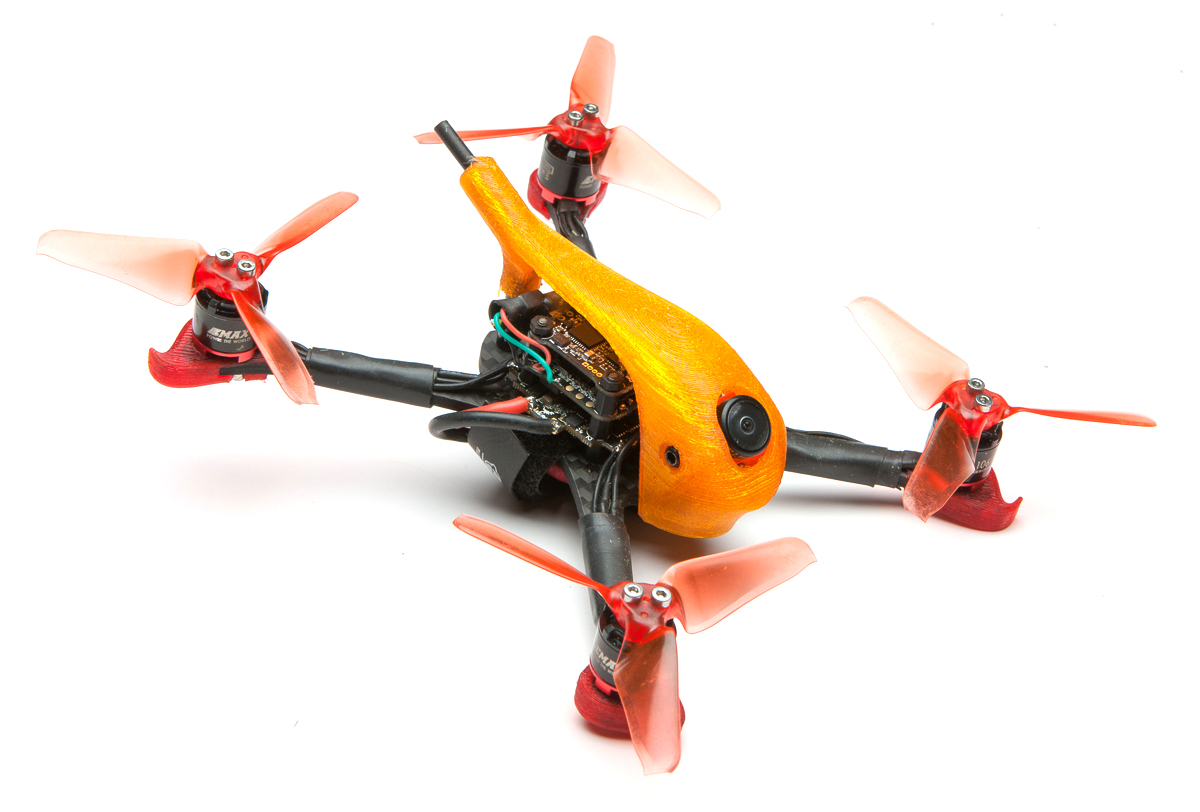
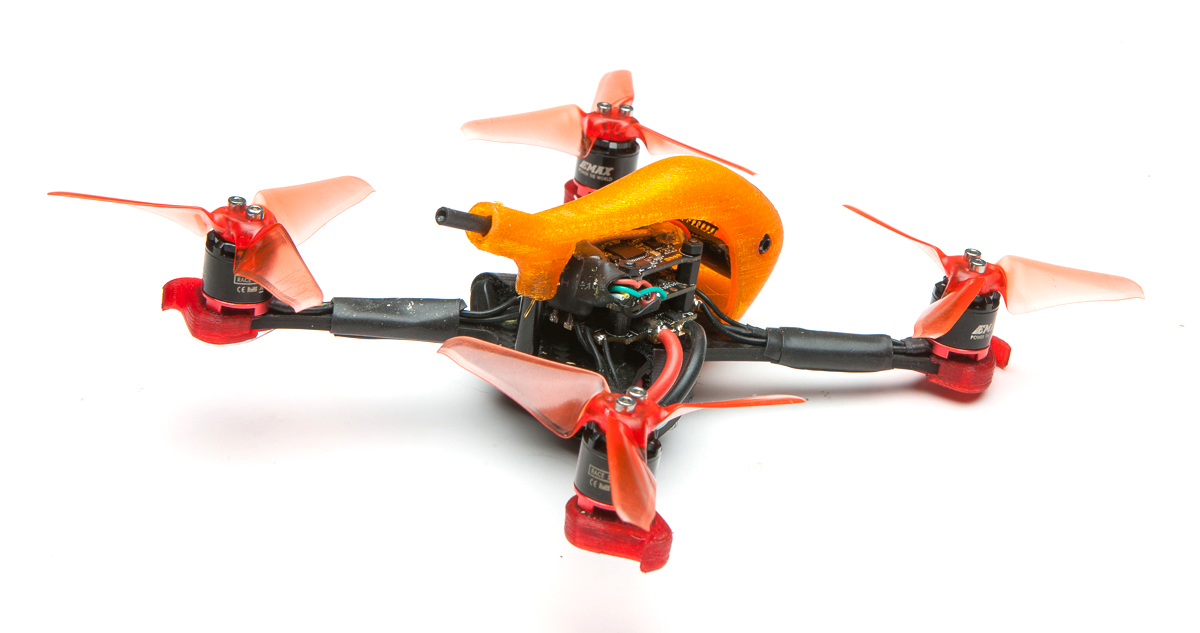
And this is what you end up with. Some frames come with a million parts and build instructions. I love that this is truly one piece.
I built it with a recycled 20mm stack, only to find that the vtx received no power. I bought a whole new stack and built it up, but one of the connectors had a bum pin and the vtx had no power again. I got a warranty replacement for the vtx and still no joy, so I bought yet another complete stack, this time from another manufacturer. The irony here is I'd resolved to never buy anything form this manufacturer 'cause I had one failure from them already. Nevertheless, about 3 long weeks after I started building, it was ready to fly.


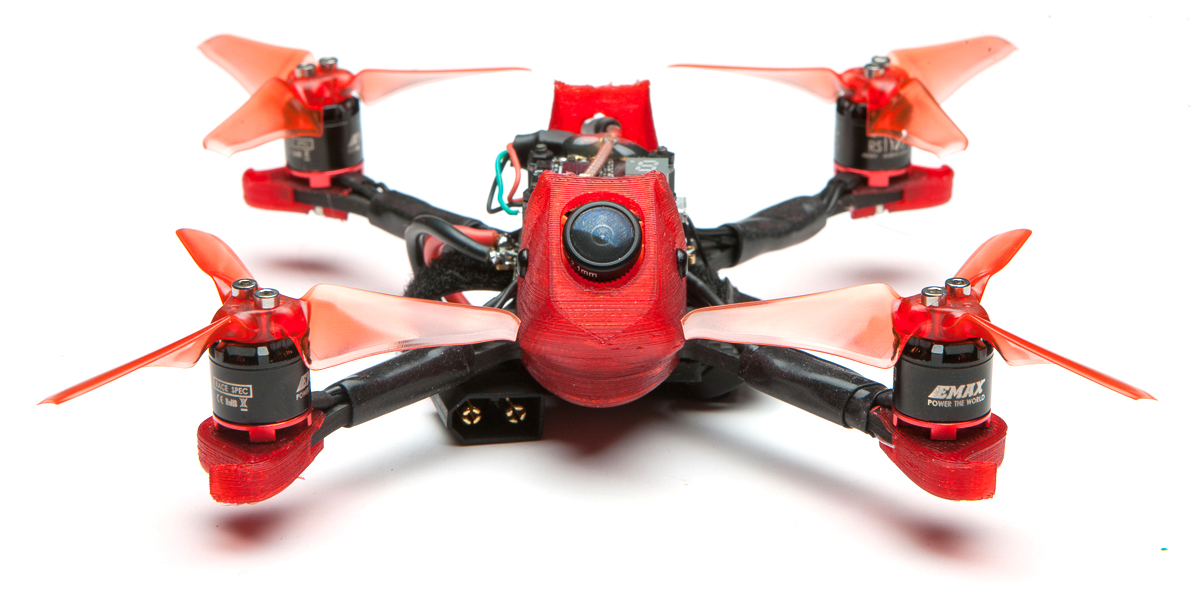
It turned out to be incredibly fun to fly, just so light and agile. I remember having to adapt to flying Hedwig as it was way more float-y and didn't like to dive. This guy flies a lot more like a 5", perhaps due to its lesser frontal area. The main difference between it and a 5" is its ability to turn on a dime.
I made Control give it a shot. He has a tendency to go full speed right away, and he gave it a good bashing before he got acclimated. I was relieved that the exposed stack survived.
So at this point I'm feeling pretty good about the frame, and I ordered more carbon. Then I started work on a Runcam Split Mini version, and came upon a cool cam pod concept: I could slip the pod over the nose up front, and the rear could slide down over a 20mm standoff. This would give the stack some protection, and it would make the build much easier since it would be pod-less during assembly (the original build was like a game of Operation). As much as I hated to start over it was clear this was a better way to go.
For my first attempt I merely extended the original pod, and it worked fine but visually it was obvious that it was a patch job.

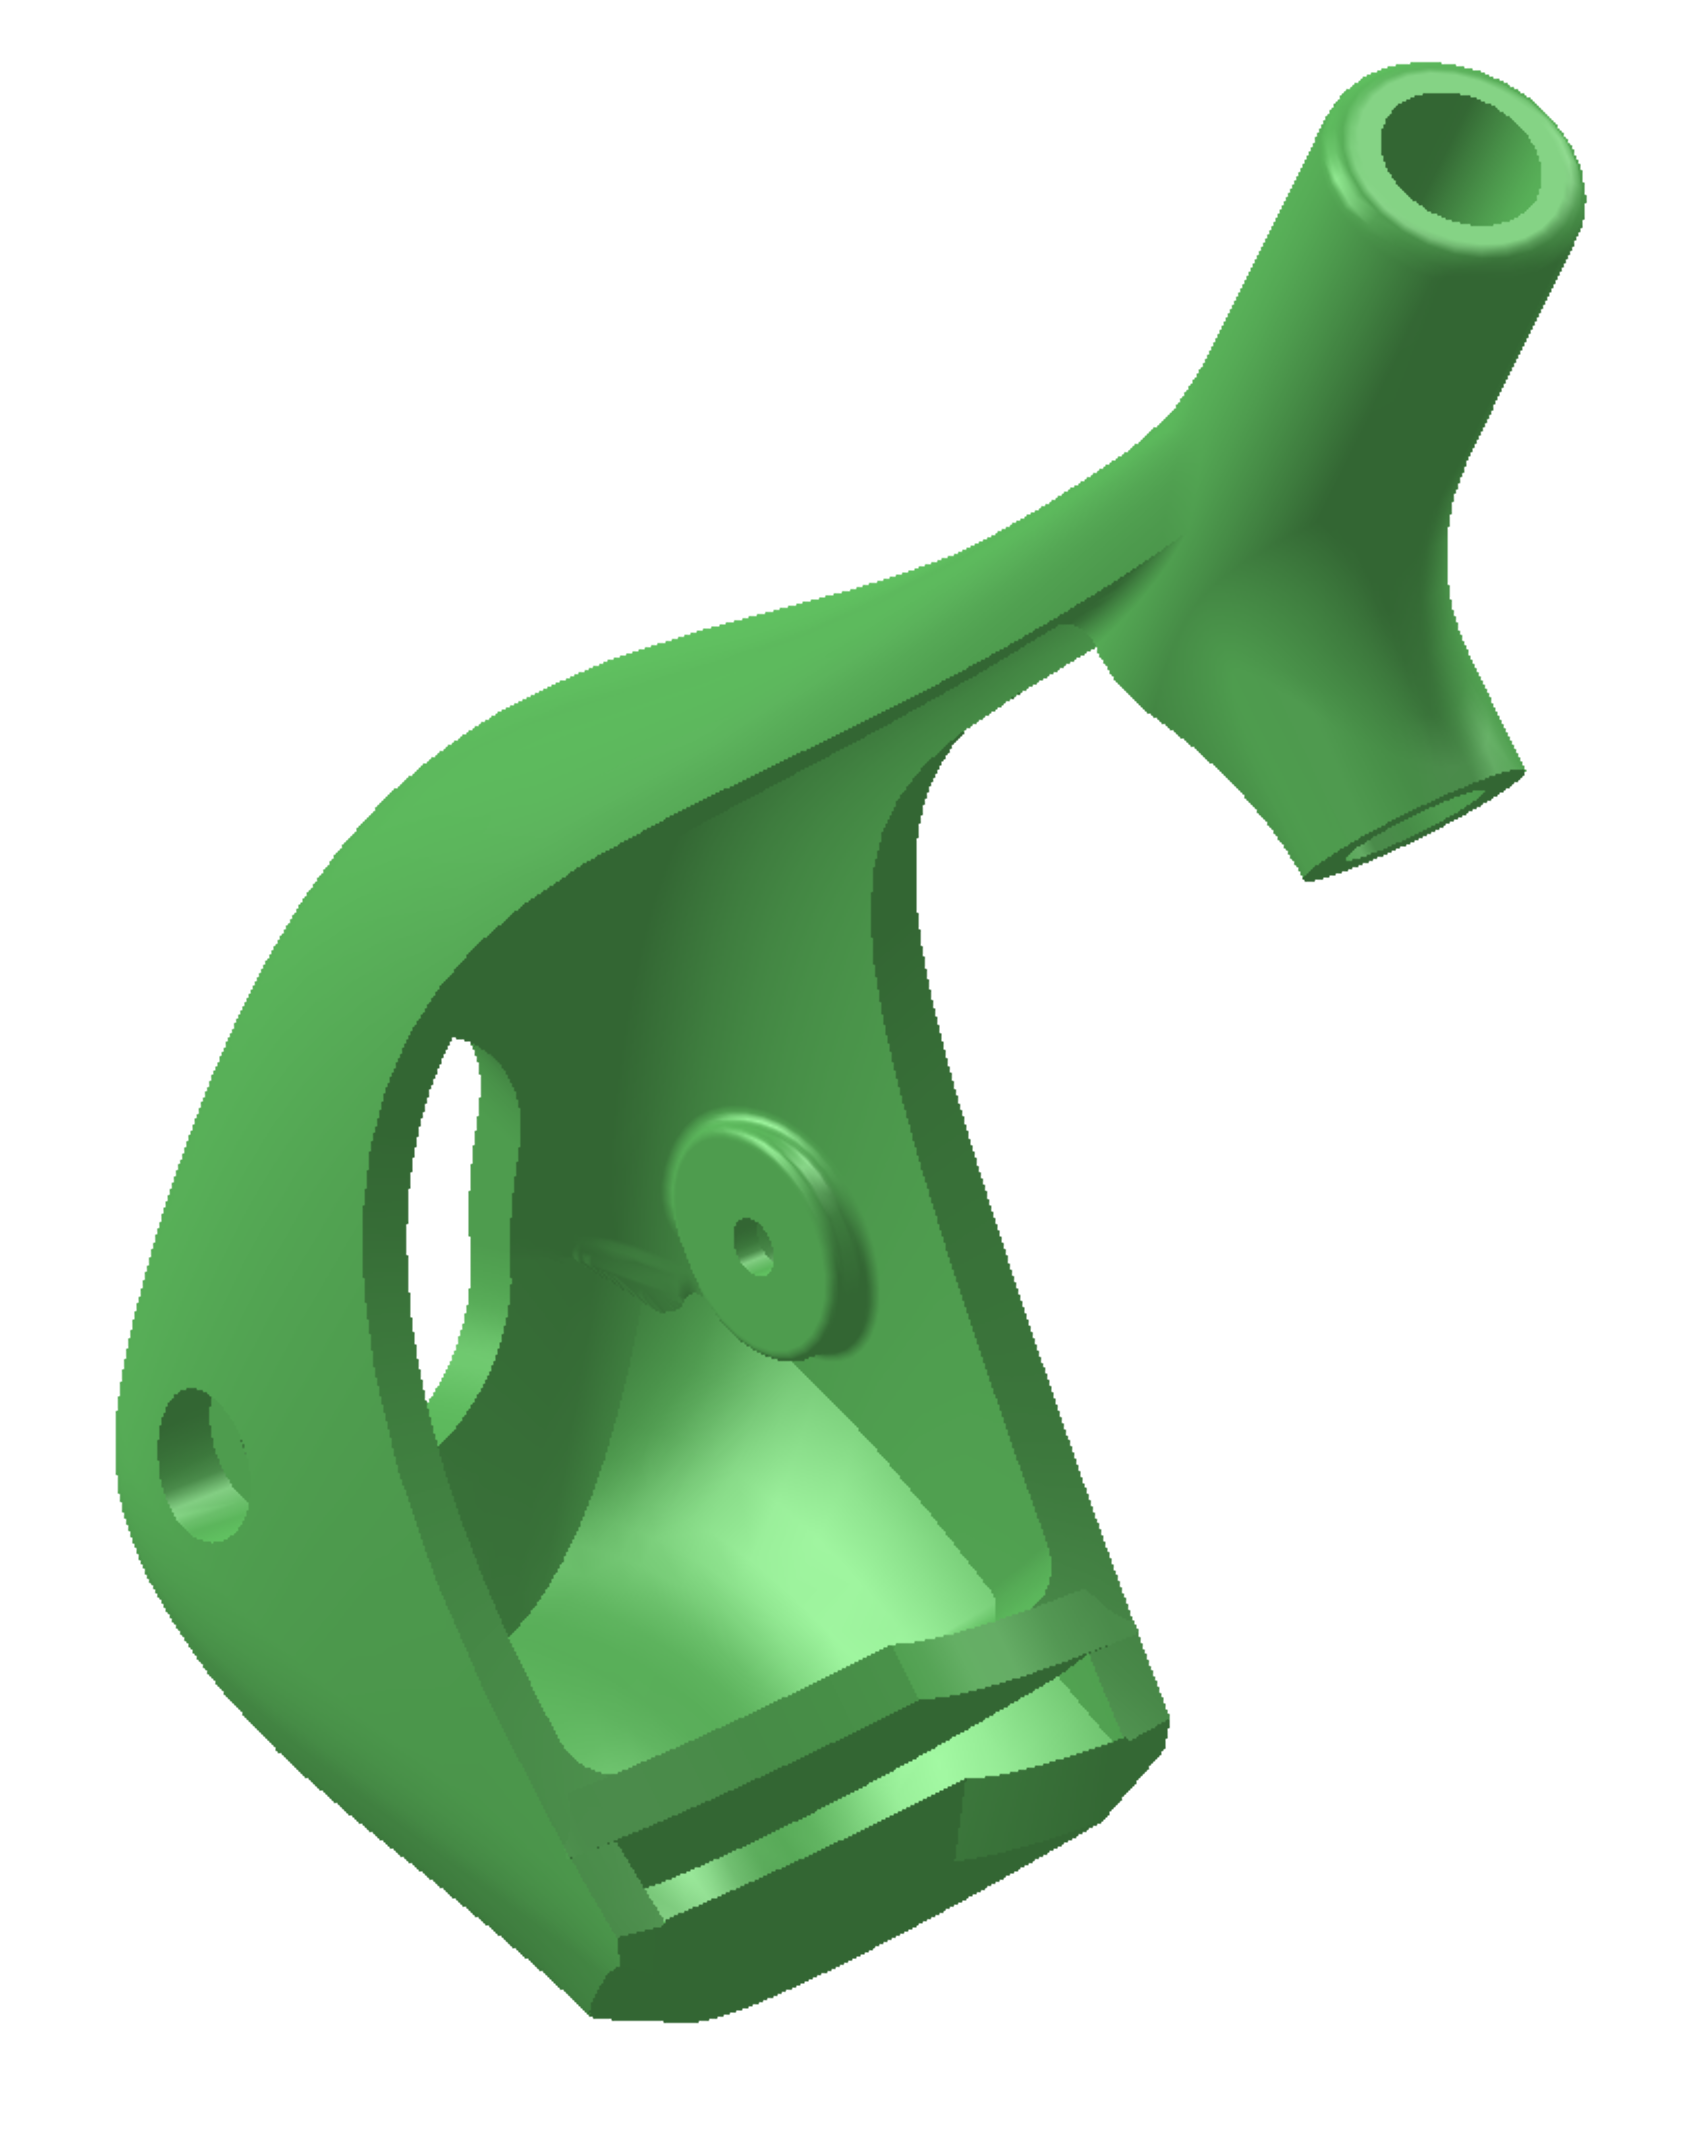
Not only were the aesthetics lacking, the roof wasn't particularly stiff. If it had more of a concave curve it'd be a lot more rigid, and more aero to boot. So I started fresh with a complete new pod, unwittingly sentencing myself to Solidworks hell for a couple of days. Here's a synopsis of how the final part was made – you'll see why it took me three whole restarts to get it right.
The best way to make a part like this is with surfacing – you have much more control with surfaces rather than solids. Step one is the bottom of the pod, a simple Planar Surface offset 2mm down from the carbon and 2 mm out.

Next the profile of the pod is drawn. The dotted lines in front are reference points for the fpv cam, for 30-60 degrees of tilt.

When you thicken a surface it can have an imperfect edge (even if you make that surface perfectly perpendicular to the middle plane), which means Solidworks may refuse to mirror it later. To avoid this I first make extruded surfaces from this profile. These surfaces will be thickened along with the pod, and then chopped off to leave a perfectly flat surface to mirror from. For the first few iterations I dealt with this problem by patching the bad edge, but it's an inelegant fix and it can make the part fall apart if you try to edit it. I had this epiphany while walking the dog and boy did it make me happy.

Solidworks likes four sided surfaces, so you have to figure out a way to divide your part into pieces that can be properly rendered. It took me a few iterations before I figured out the best way to cut this up. Here's the first four sided Boundary Surface. I had to extended the side down much lower so that it would render with a smooth, relaxed curve. You can apply constraints to each of the four sides. In this case I made it tangent to the adjacent extruded surface. This ensures that the finished pod will have a smooth curve across its centerline.

Here's Boundary Surface #2, another four sided surface.
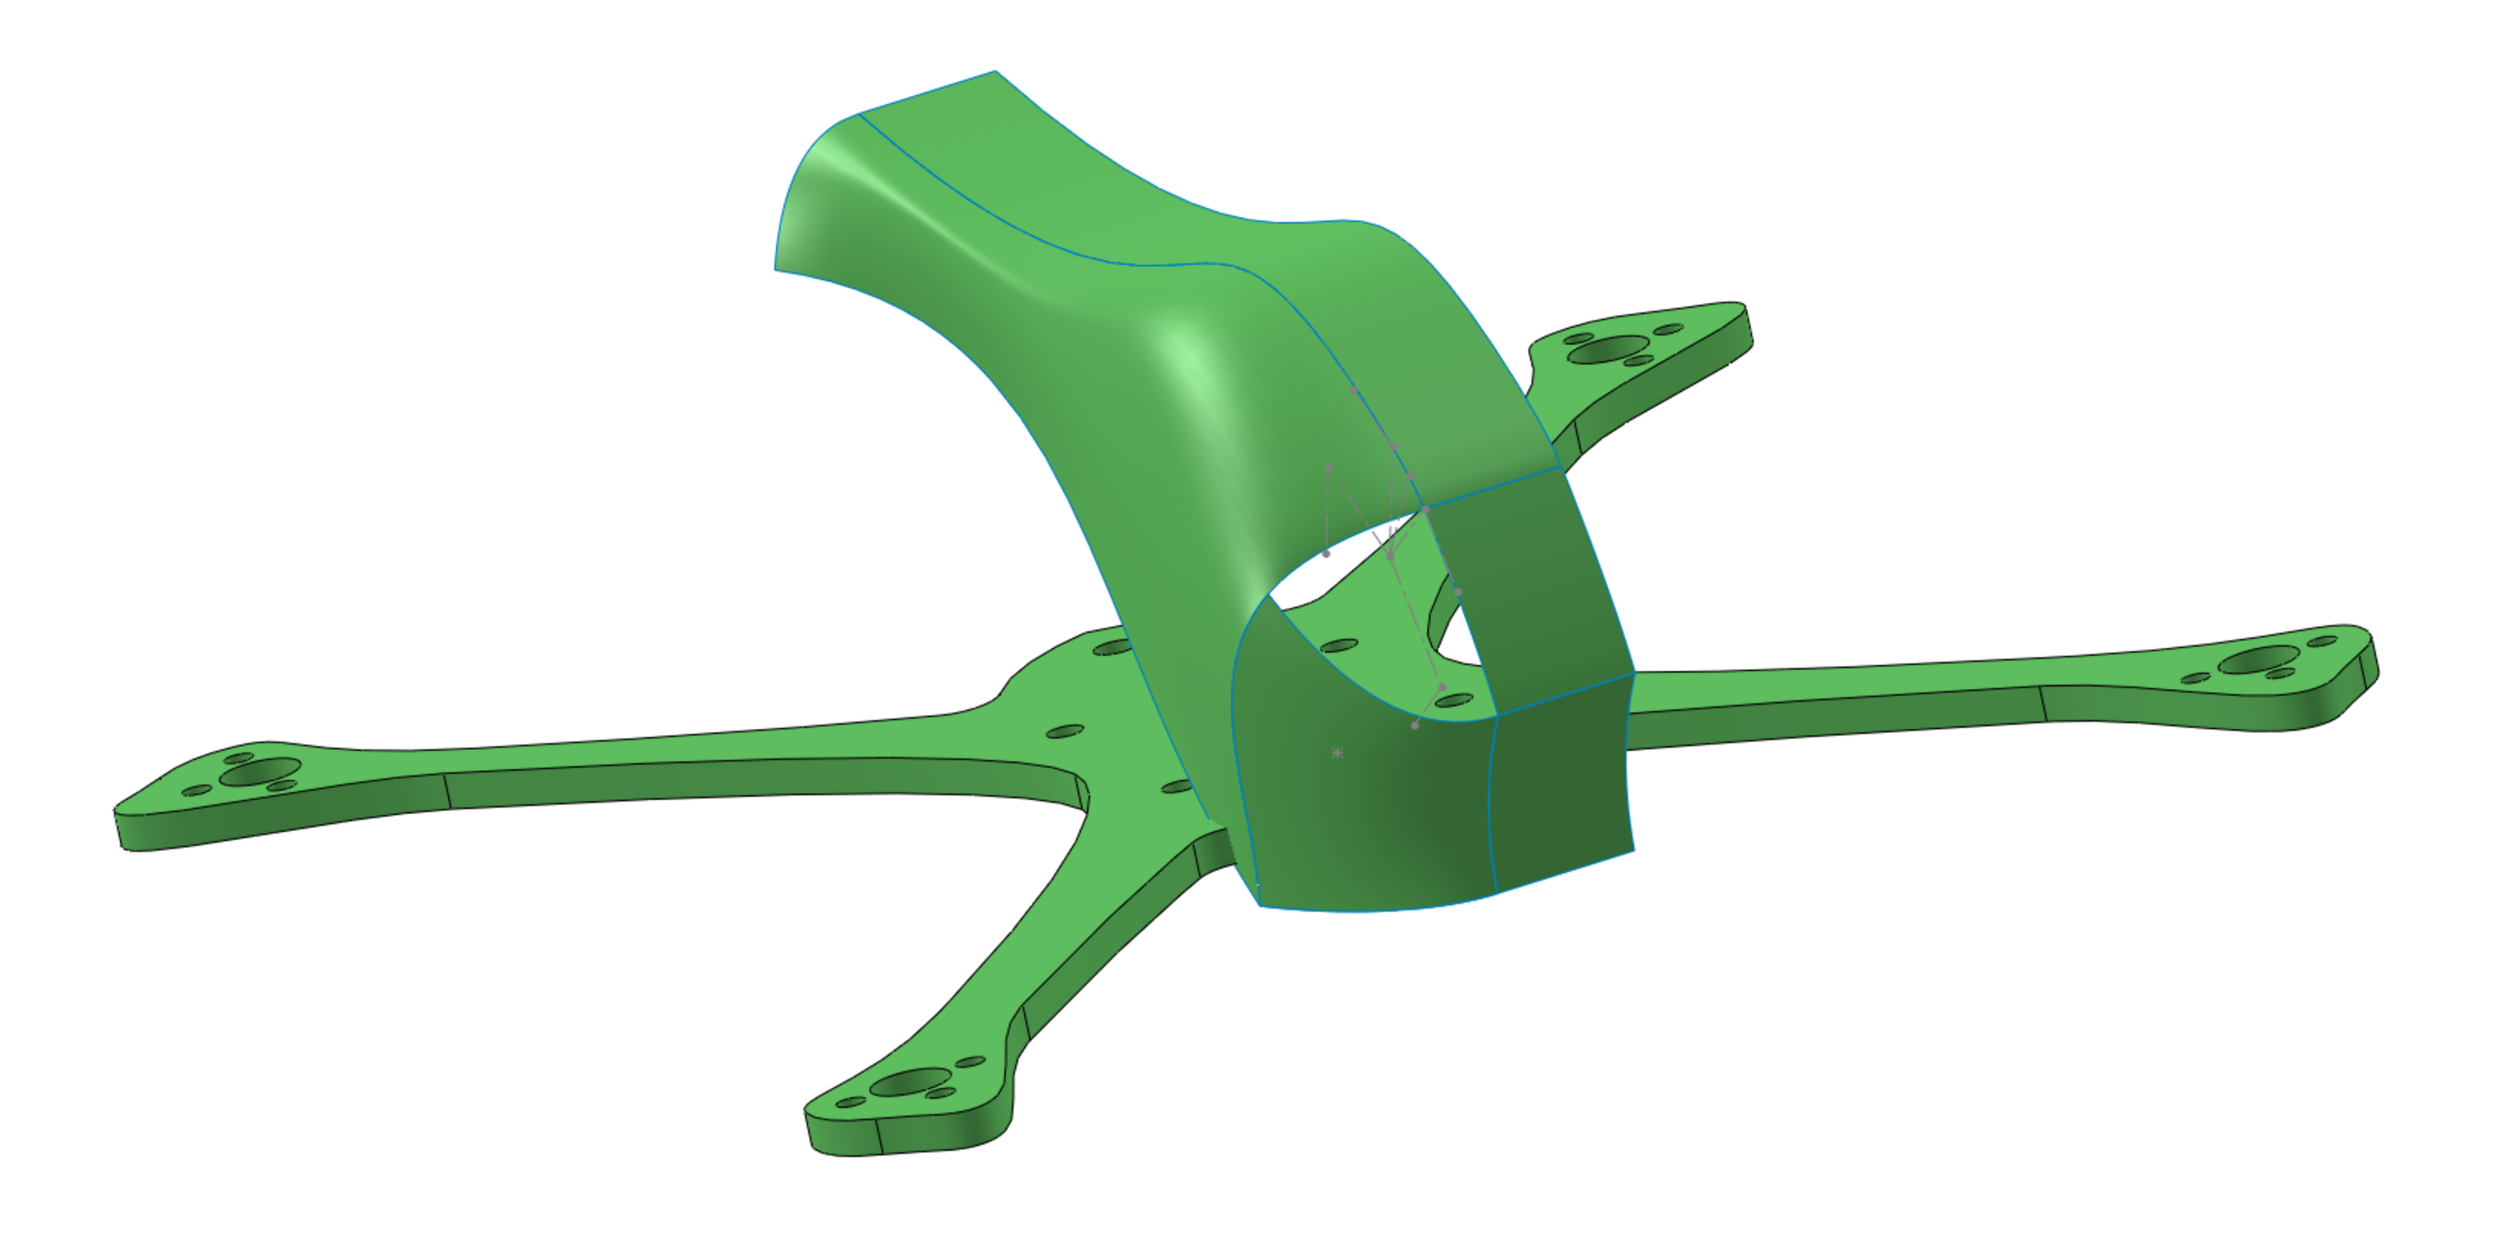
Now I'm just left with a small, relatively flat and simple opening. In this case you can ignore the four-sided rule and just make a Filled Surface to finish it off.

Now that the pod is surfaced, I can trim away the excess so it clears the stack. The purple part will be deleted.

Next the surfaces are knit together and then thickened to 2mm.

Now that the extruded surfaces have done their job, they're trimmed away, leaving a perfectly flat surface aligned to the middle plane.

Lens opening cut, excess tail trimmed, bottom edge chamfered. I do a chamfer on the bottom because it prints better than a fillet.

FPV cam mounting holes added, the ridge on the cheek is filleted, and a shelf added above the carbon.

A post to slide over the standoff and antenna tube added.
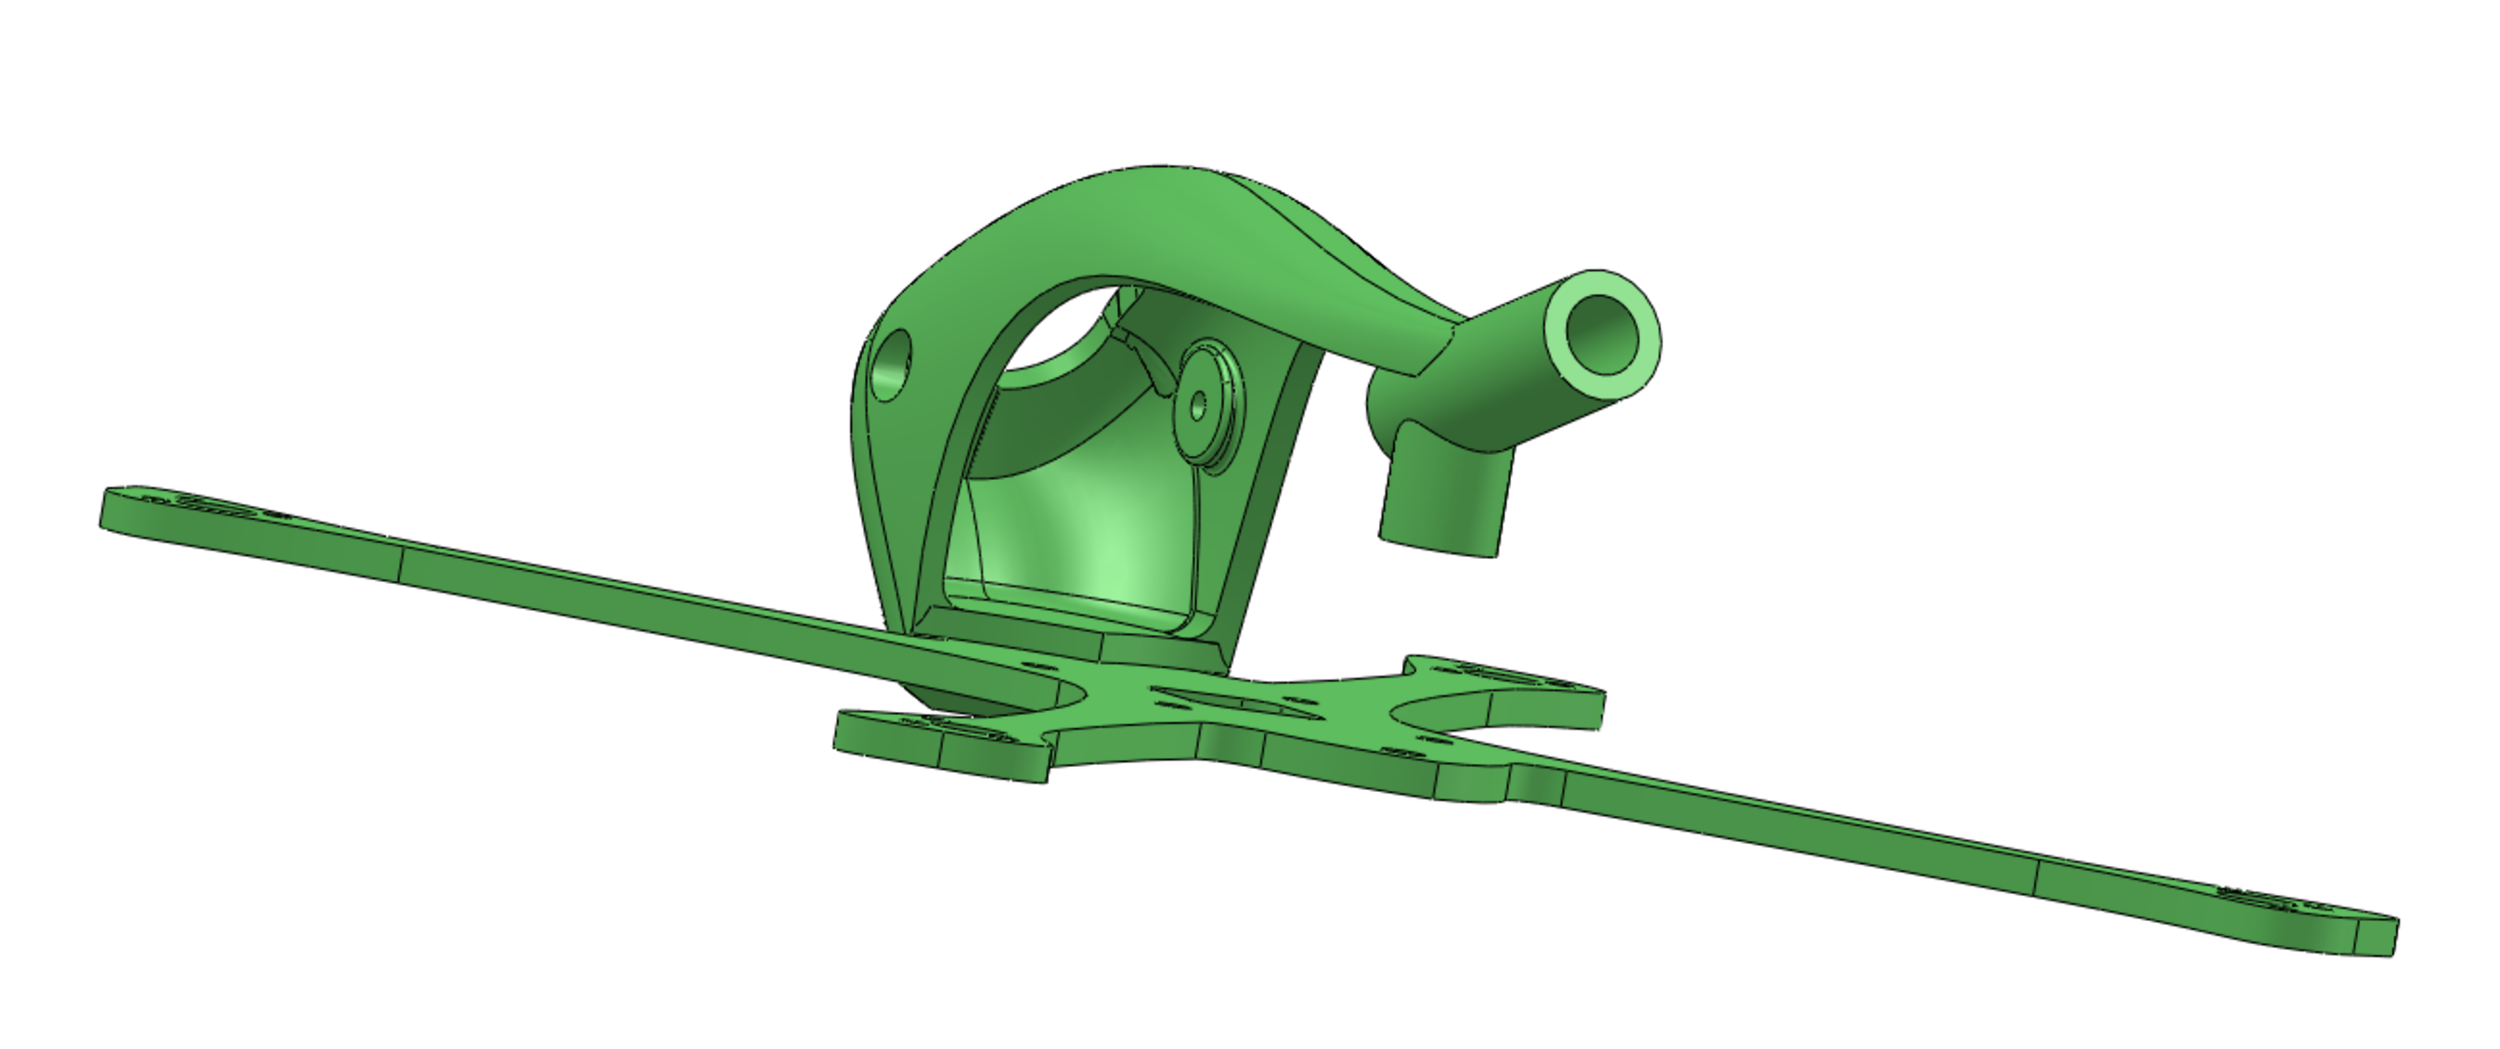
Fillets added to smooth things out.

That gap down below is where the carbon slides in. Then the antenna goes into the tube, and the rear slides down over a standoff.
As expected the concave roof was much stiffer than the original, flatter one. The entire build is only 106 grams without a battery, so the pod is more than strong enough to protect the stack against most impacts.


My plans for a friction fit pod turned out to be overly optimistic, so I added a screw hole to the nose and a spot for a recessed nut. Now it stays put in crashes.

It works fine without the nut, but it's just another layer of safety. And yes this is an UFL-Axii version of the pod.
You can order your own Pteromini here.
But Wait There's More
I'd tried the Runcam Split a while back, and wasn't impressed with it at all. I really didn't like the fpv video quality, nor the final HD video quality. I put it out of my mind, but then I started to hear that gen 2 was much improved. So when they came out with the Split Mini I thought the Pteromini form factor would make a good frame for it. I envisioned something that could function both as a freestyle frame and a McIntosh-esque proximity ap sled, with no props in the video.
With the fc, esc, vtx, and Mini Split, you get a pretty tall stack. I decided to divide the boards into two stacks, with the Split's two boards up front near the camera, and the fc/esc/vtx at the back. If you angle the arms so that they lead to the rear mounted esc, you end up with a Tweaker-like layout. With those points locked in space the frame flowed from there. The canopy holds the cam at 0-60 degrees of tilt to support freestyle and proximity flying.


At first I thought it'd be cool to have the canopy go from convex to concave, thinking it'd look cool. Turns out that not only did it look dorky, it ended up weaker. The canopy flattens out at the transition from convex to concave, and at that flat point it loses the stiffness created by a curved cross section. So it was back to the drawing board.
There's an extra set of holes so you can do a single centralized stack if you want.

Phew, much better.
I built it up before I discovered RotorX 1404's, which, in hindsight, would've been a better motor choice. The rest was pretty straightforward, with an HGL-RC aio stack.

I was happy to find that the Mini Split was indeed a great improvement over the first gen Split. Both fpv and hd video was terrific. It flew fine on both 3 and 4s. HD video was very prone to get jello, and I had best results with the Gemfan 3035's pictured above. Here's a quick clip of 0 degree flying, with me pretending I was flying something tight like that Japanese schoolgirl clip.
Since this was a version of the Pteromini, I was able to get things pretty correct on the first try. The only change I made was adding a screw down for the pod. And with that it's ready, you can order one here.