
Blast: Design
How I designed a shooting drone.
I visit my sister in the Bay Area every Christmas. 2 years ago (’13) her sons were entertaining my 10 year old daughter by digging up their childhood toys, and among them were several disk shooters. Not having been a kid for a while, I was utterly fascinated by this quantum leap in toy technology and probably played with them more than the kids. I just loved that there was a totally harmless gun that shot things with incredible accuracy and on a flat trajectory, more like a laser than a projectile. I enjoyed them so much that my nephews made us bring the shooters home, telling my daughter she needed to send videos of her shooting down my quads.
Not wanting to be gunned down, I thought it’d be even cooler to mount one of them on a quad and shoot back. After pondering some servo triggering ideas and finding it all too ghetto, I decided that I had to make a purpose built flying disk shooter.

This on a quad = NOT badass.
Disk shooters are pretty simple: it’s a spinning barrel that squeezes out a disk against a stationary pusher on the opposite side, kinda like those football throwing machines. Since there’s only a motor on one side, the disk is shot out with spin, like a frisbee. Brushless motors, with their revolving bells, fit the bill with no modification necessary. Perfect.
I stocked up on Nerf disks and started testing to find the optimal distance between the motor and the pusher. I also found the slight angle the disks fly out at (it’s not quite perpendicular to the line between the motor and the pusher). With that info I drew up a 500 sized quad with clean/dirty sections, a hopper for the disks, and a continuous rotation servo to push the disks into the motor. For the pusher I used a carbon rod I had sitting around. It’s the excess cut off of racing bicycle forks, and it’s 1 1/8″ in diameter, or almost exactly the same as a 28mm motor! The business end looked like this.
Yeah that’s a KK2. It was a long time ago, don’t judge.
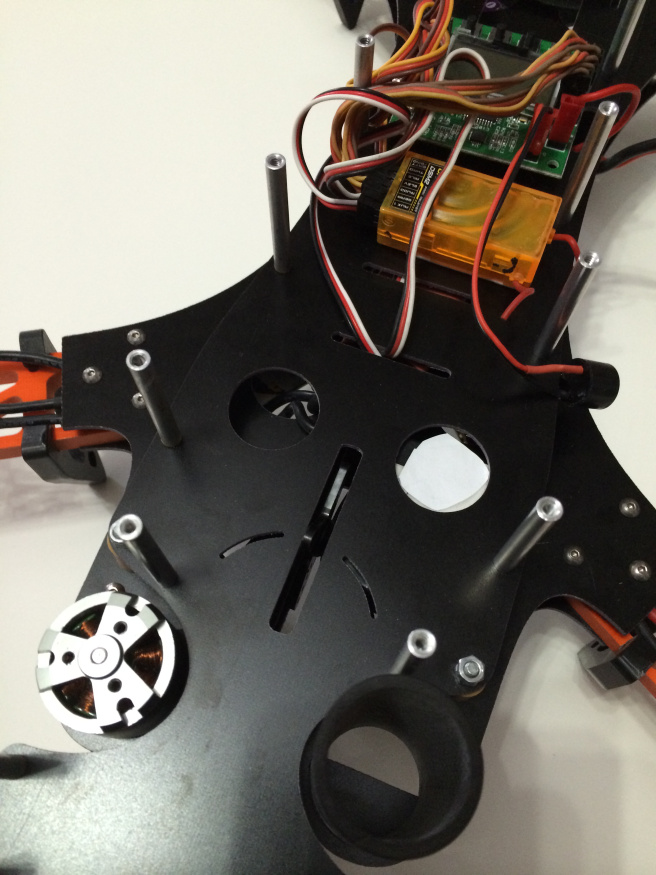
The motor’s on the left, the pusher rod is on the right, and the servo arm is in the slot in the middle, as it rotates forward disks are shot. The two arc cutouts hold the hopper in place. The whole shebang looked like this.

If the hopper looks familiar it’s because it’s the core of a toilet paper roll. It’s the perfect diameter! Now I’m a little excited, because…
I mean, srsly, right? And there’s also this. Head shots! It's incredibly strange to shoot yourself with a quad. You're observing yourself like an out of the body experience, you trigger the shot but the shooting sound is coming from elsewhere, and after a delay you're jolted by the impact amidst the sound of incoming fire landing all around you. I almost shot the transmitter out of my hands a few times. I found it really hard to fly well while aiming and shooting. I really wanted to do a good 'circle strafe', a nose in circle around myself while shooting, but I would always get hung up mid-circle. Without shooting I can do laps around myself for minutes at a time.
At this point I could do one of two things. Start a punk band called Quadcopter Suicide, or contact Tim Nilson of Lumenier (crazy factoid: Tim and I raced bikes together in New York over ten years ago, before quads existed. You know, the dark ages. This was the first project we collaborated on, the Danaus was second but was released first). Tim agreed to take on the project and we started refining.
Tim immediately eliminated the clean/dirty thing. It’s not an aerial photography rig, no need for the extra weight. I realized that the pusher only needed to be a tiny arc, not a 1 1/8″ diameter circle. That narrowed the front end quite a bit, and gave it a jaunty asymmetrical look, like this.

I drew up the next version using Lumenier hardware and arms. Tim had some cut in carbon and they were ooooh so nice. The G10 and carbon/fiberglass versions got tossed aside immediately.
This version needed product testing too.
At this point I was still using a huge continuous rotation servo, which protruded out the bottom of the bottom plate. Aside from being ugly and inelegant, it was an expensive part that was hard to source. Furthermore, it's impossible to tell where the servo arm is when it stops and starts, so you can get weak misfires on the first shot if the arm is in the wrong spot.
We hadn’t figured out the barrel either, but we knew damn sure it wasn’t going to be a toilet paper roll. Tim eventually found a plastic material that we rolled together with snaps, which in turn snapped into the middle plate. Getting a rolled up piece of plastic to fit snugly in a hole was quite a challenge – if the circumference is even a fraction of a millimeter too big it's not going through the hole. Between the snaps and the perfect fit through the top plate, the hopper was rock solid. The barrel was a potentially problematic piece for us, and Tim really nailed it with a very elegant and economical solution.
The servo mech stumped me for a while, and after a few iterations I came up with this.

Looking back, I have no idea why it took me so long. Dummy.
Now we could use an inexpensive 9g servo, and the whole mechanism fit between the middle and top plates. Unlike the continuous rotation servo, this setup had definitive on and off positions. Without that big servo protruding out the bottom you could go without landing gear if you wanted. I was particularly proud of the way the servo mounts – the mounting flange slips through a slot in the middle plate, and a zip tie holds it down. Simple and solid. Tim lasercut a delrin version of the front end to test the mech.
Finally, in August of ’14 I flew down to Sarasota to finish off the final details with Tim. We built a test jig and shot disks with a bunch of different motors to find the most powerful one. The motor is custom wound just for this application. Tim tweaked the barrel design some more and redrew the crescent shaped stanchion so that it could be easily CNC’d (the version in the video above was 3d printed). For a guy who sends away to Canada for his parts, it was quite amazing to draw something and see it made instantly.
If you knew how much time we spent tweaking the shape of those snaps…
