Dualist
I've been getting more into aerial photography lately. Niche AP rigs like the Ichabod and Squirt are real fun frame design challenges. I've also been working as Randy Slavin's camera operator while he flies his Alta 8, and that's given me a new appreciation for dual operator AP rigs and LOS flying. Then I was invited by Charles Zabian to be on an AP panel for Canon, where I got to meet some industry leaders in drone design as well as content creation. Even though I was a panelist at the event I ended up gaining way more knowledge than I dispensed.

Here's Trent Siggard exposing me for the fraud that I am. Yes, that's Steele at the end of the table
While at the forum I was challenged to make the smallest possible dual operator AP rig. As far as I know the DJI Inspire is the smallest dual op rig out there, so it'd have to be smaller than that. And given how good DJI stuff is these days, this rig needs an angle for its raison d'etre.
Two things sprung to mind immediately. First of all, it'd be ducted. Ducts generate more thrust, so you can use smaller props for a given payload. They also double as prop guards so you can safely fly close to people. Secondly, this will be a rig for us FPV'ers, not the general public, so it can be piloted with way more precision than a DJI.
The first thing I had to do was revisit duct design. I've made several ducted quads before, but I've always reduced the duct size to make them work with the overall frame. This time I wanted to start with the ideal shape (which I stole from here) and gradually pare it down to see how big it really needed to be. I drew up the ideal 4" duct and a carbon arm to support it, and made a thrust stand for it. I tested a 4 blade prop and a 3 blade prop, and the tri was much better. Then I trimmed off about 15mm from the bottom of the duct and tested it again. Then I trimmed off the outer half of the lip and retested. Finally I removed the duct completely. The numbers are here, under day 2 (ignore day 1 I had an esc fire!). I used the same two batteries for each configuration, and started logging the thrust when it reached its peak, then took 5 measurements at 10 frame intervals.

Here's the full duct.
Bottom chopped off.

Outer lip chopped off.
Based on those tests, I determined that it was worthwhile to keep the full height of the duct, but not the outer half of the lip. Then I realized that I screwed up and made the walls slope out at 10 degrees instead of 5, so I redrew the duct and designed a full frame around it. As you can see, the duct is braced on four sides to better maintain its roundness. This is critical for keeping the gap between the prop and the duct as small as possible.
I wanted it to be as modular as possible, so I added battery strap slots above and below. As with the other ducted frames, the ducts are slightly smaller than 4" around so that you have to grind down the props for that tight tolerance.

The ducts print upside down so I moved the mounting tabs above the carbon so that they can print without supports.

When the carbon arrived I hurriedly bolted an arm to a duct and had a nerdgasm over the way the two meshed perfectly.

Next I mounted it to the thrust stand to see if the 5 degree walls perform better than my 10 degree mistake, and was very happy to see that it did (those numbers are under day 3). Now I had a full 250g more thrust per motor, or about 5kg total thrust for a drone that should weigh around 1kg. Time to build.
I cobbled it together with some old Brother Hobby 2206 2600's, a Fortini F4, and Aikon 4 in 1. The unusual thing about this build is the way the wires have to go through the duct. I wired the esc to Racewires, then mounted the duct, then mounted the motors and soldered them to the Racewires. It'd be a PITA to repair, but it's super clean. You could also route the wires through and solder direct to the esc, or use bullet plugs.

Then I drew up a super simple fpv cam mount that bridges the mounting points on the two front ducts.

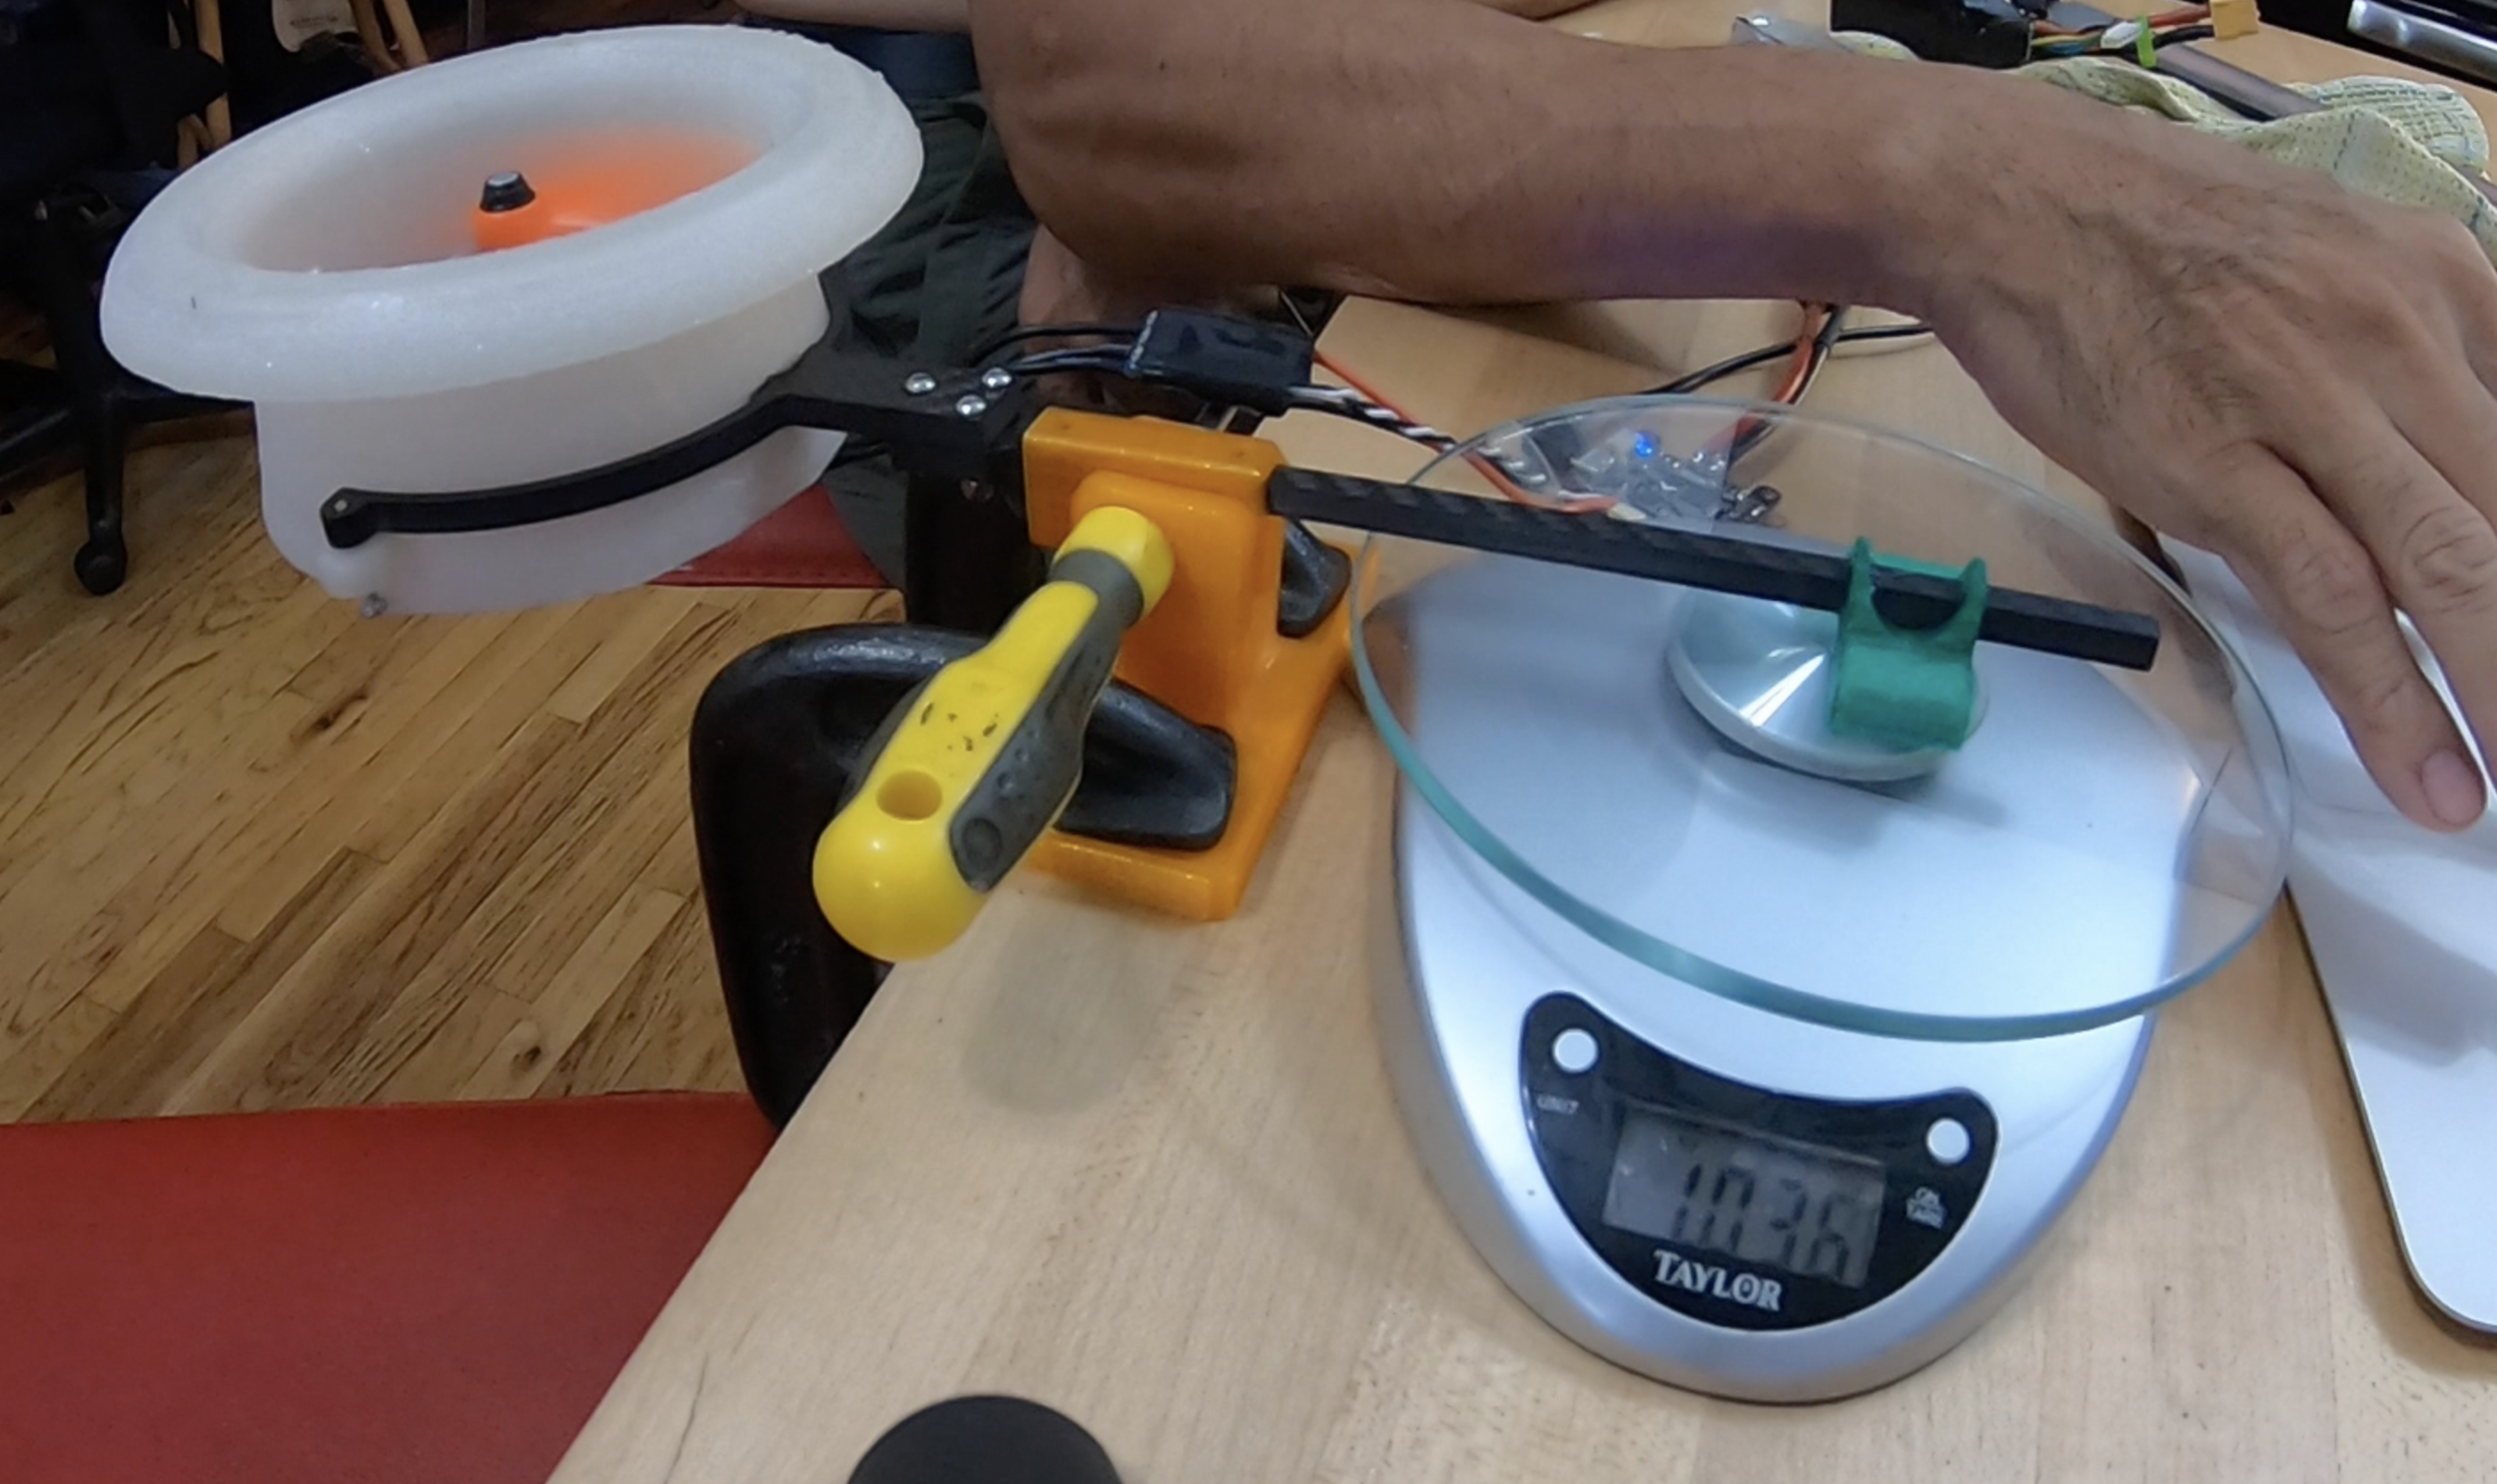
The rest of the build was pretty straightforward and I was hovering it in my apartment at 4am. At 650g, it was surprisingly powerful and spry.
The next morning I strapped a 3700 to the bottom just to weigh it down, bringing the auw up to 1075g. As you can see it hovers at 50%.
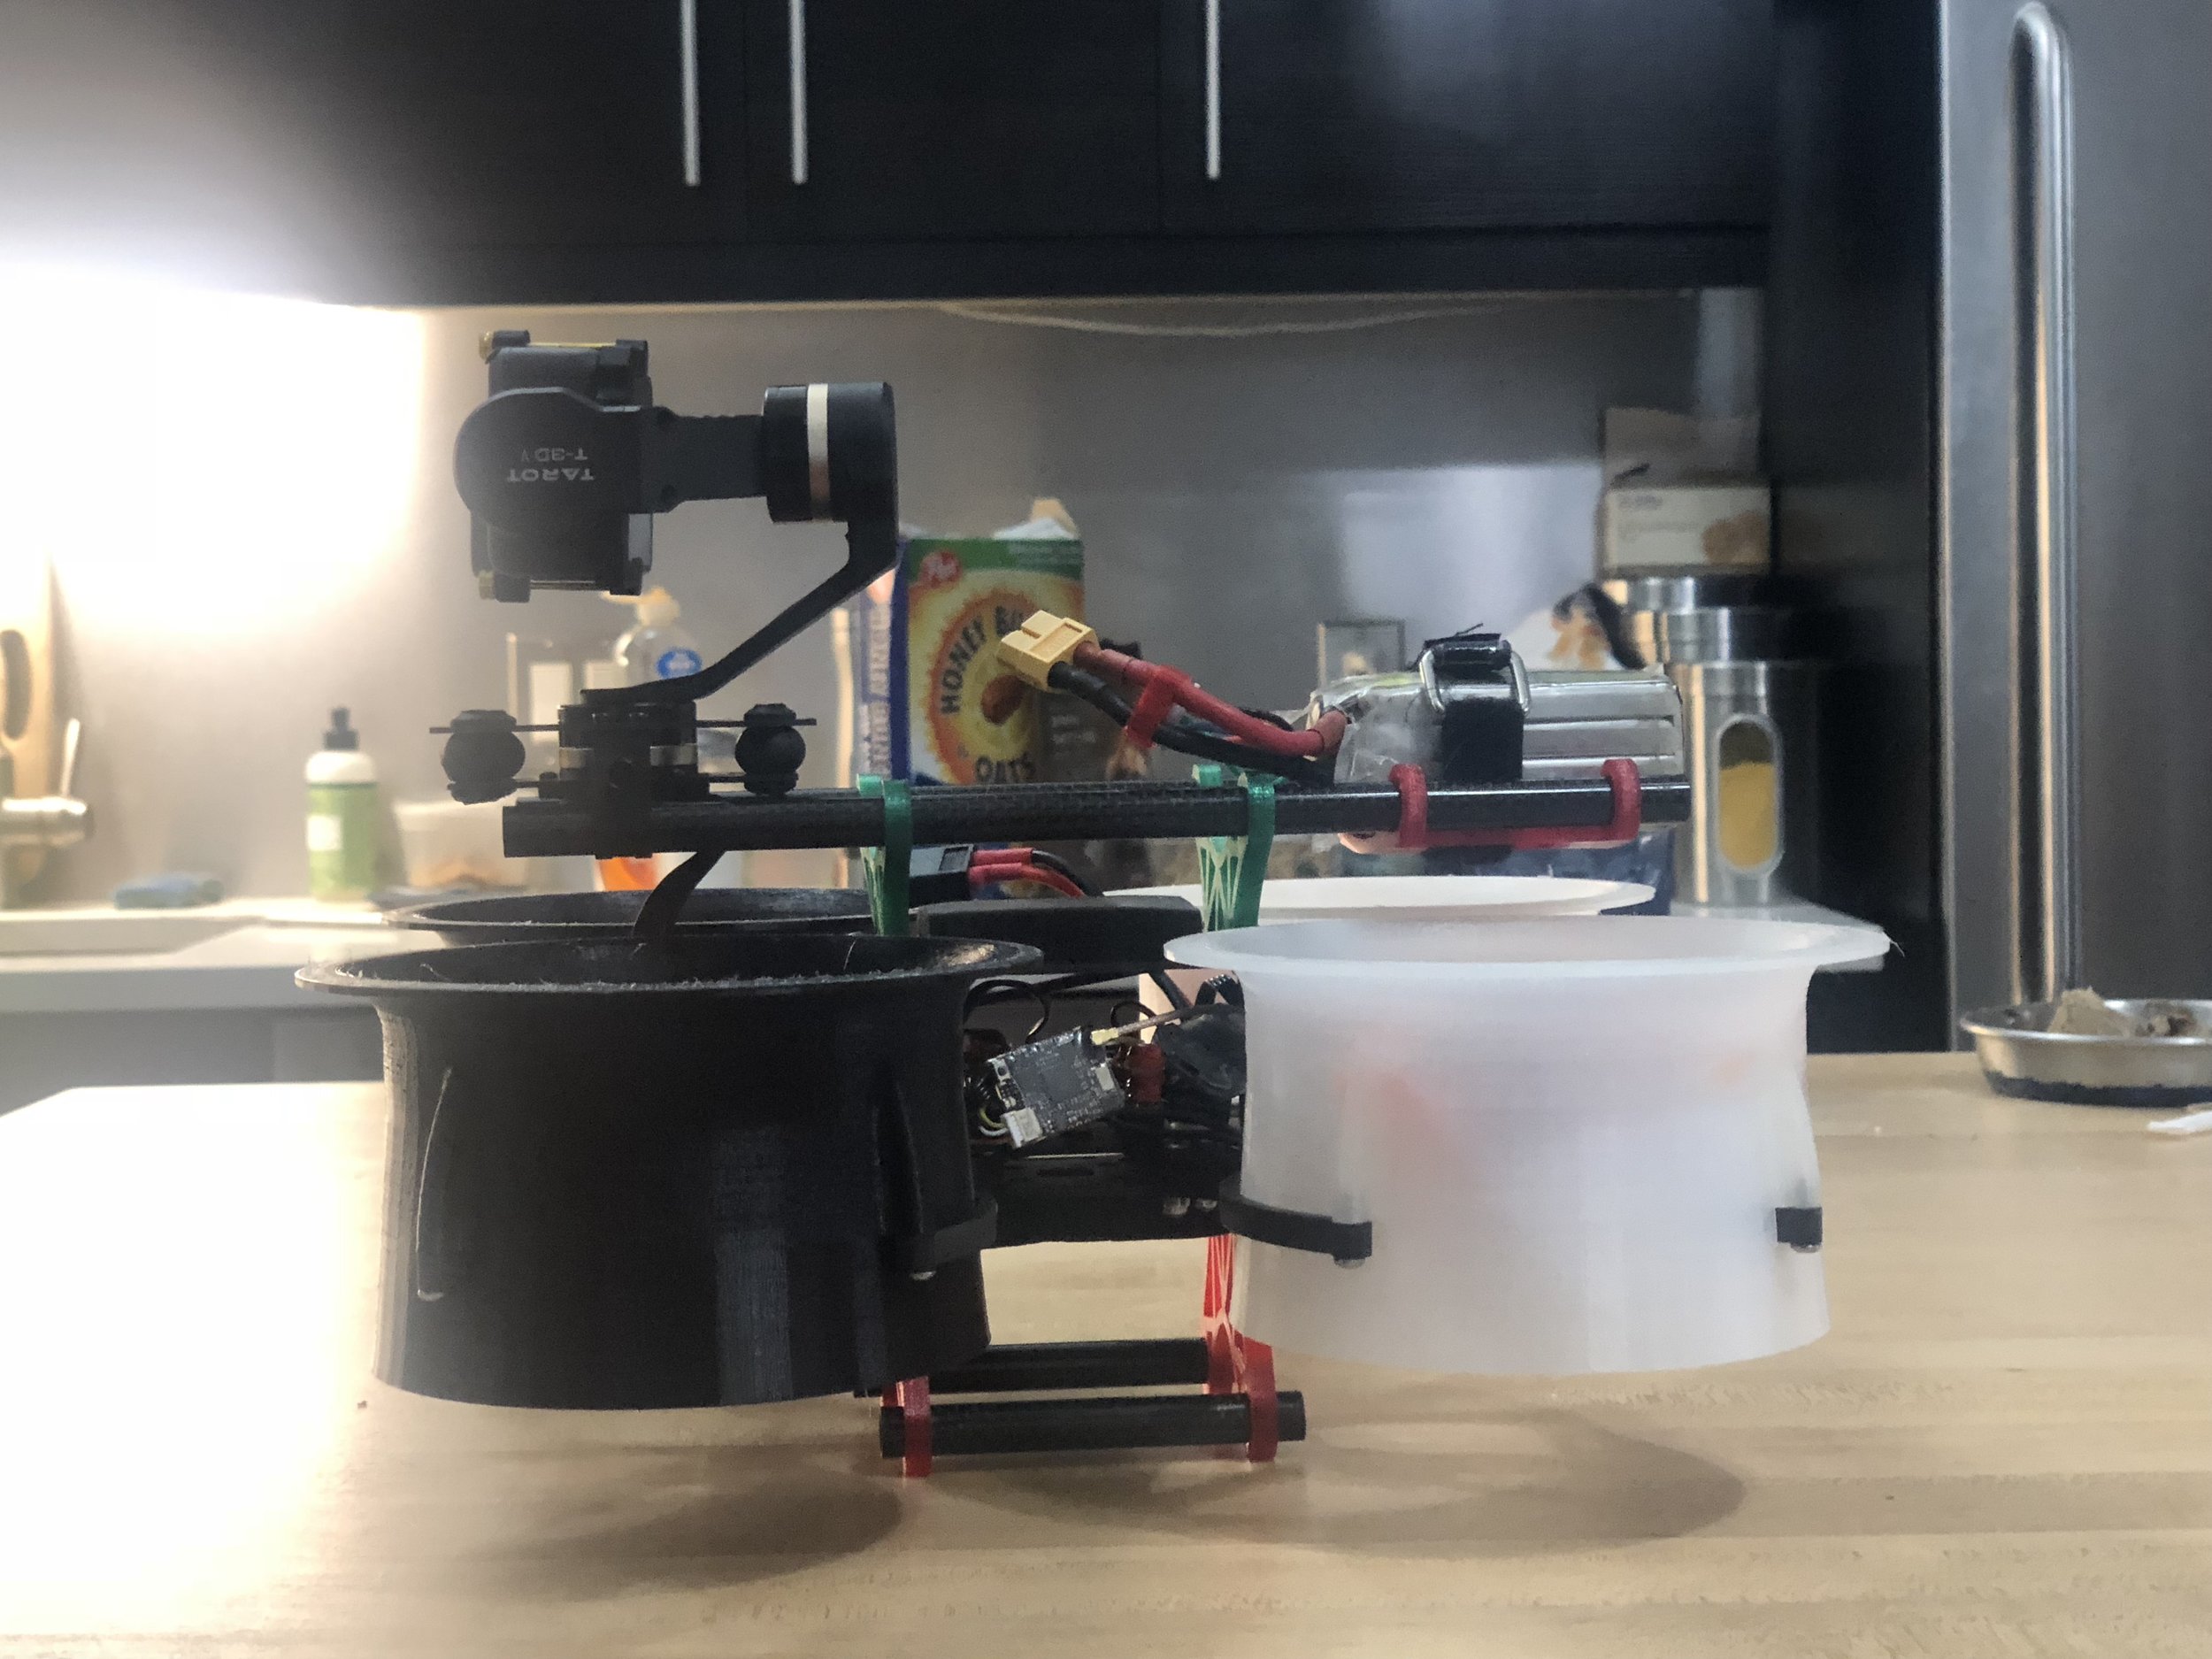
I fpv'd it for a quick lap around the apartment and it flew quite nicely, so it was time to strap a gimbal to it. I'd bought a Tarot ZYX T-3D 'cause it had the option for sbus control. The manual's a bit...opaque, so the first thing I did was to just hook it up to power and let it work passively. The Tarot has 60mm wide rail mounts, so I bought some 10mm carbon rods and drew up rod holders. The holders can be fairly floppy on their own, as they stiffen up once the rods are inserted.

This first version was way beefier than necessary. A few mm were lopped off. In case you're wondering, the ducts are different colors for LOS orientation.
We usually fly the Alta with the gimbal below, so that's how I tried it here first. There's no landing gear here, just a big ol' gimbal sticking out the bottom, so I set up a pair of C-Stands as takeoff/landing rails. The takeoff was really shaky, so I caught it by the battery instead of trying to land it on the rails. As you can see, the catch was a bit hairy, but the quad worked! The ducts were creeping into the edge of the video, so maybe the rod holders need to be extended for more clearance.
I also tried it mounted to the top. The gimbal's meant to be bottom mounted, so to make it work as a top mount you have to mount the GoPro upside down and backwards, which makes it unbalanced on pitch. Fortunately the motor seemed to handle the imbalance just fine. The result was about the same – ducts in view, needs taller rod holders.

Hey you can turn the gimbal around and shoot follow footage. The GoPro's actually mounted wrong in this shot, it needs to turn 180 on pitch.
Then it occurred to me that I could move the gimbal way forward and get unobstructed video, I'd just have to extend the rods fore and aft so the battery can hang out way back as a counterweight. So I cut two longer lengths of the rod and drew up a battery mount. I'd also made taller rod holders which I repurposed here as landing gear to spare the ducts the impacts of landing.

Yep, the GoPro's still mounted backwards here.
And here's a quick test, no ducts in view, but there is a Corgi.
Now I had something pretty similar to my old Gimbal'd 540, except much smaller, lighter (1050g vs 1660g), safer, and with a 3 axis gimbal (in passive mode it damps yaw movements). To be fair, the big one is probably faster and better in the wind. I dug up its broken down carcass for a size comparison.

I took it out to the Bronx and fpv'd it. It flew great on stock pids, the only downside is that it catches so much wind you definitely know which way the wind is blowing. I got 4 minutes easily on 1300's, with 5 possible if I kept it slow and smooth. Everything seemed perfect 'til I got home and reviewed the footage.
So, it turns out the Tarot is a pretty sweet gimbal, in that its IMU is nicely integrated into the gimbal itself, as opposed to the old gimbals I used which had a separate IMU that you'd tape to the GoPro. The downside of this nice integration is that there's wires running through the arms, so they can't rotate the full 360 degrees lest the wires get too twisted and eventually severed. This is fine if you use the gimbal in its intended orientation, since the dead spots are pointed straight back. I had the gimbal mounted upside down, so I had only about 20 degrees of uptilt before it hit a hard stop.
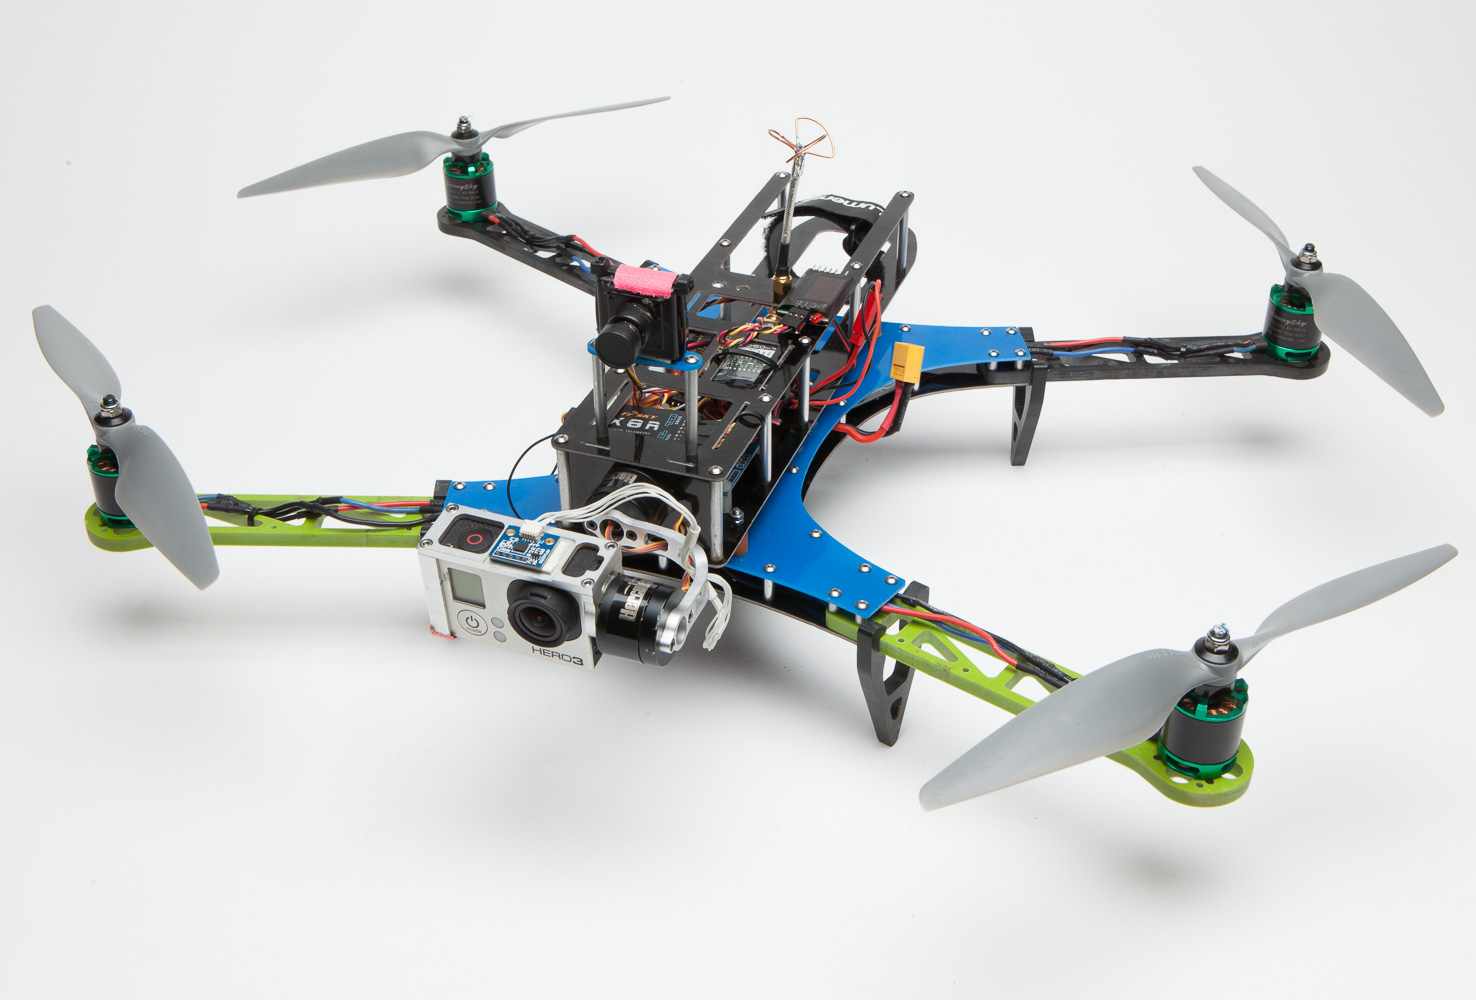
Hey it's the old drone before it was smashed to bits! With a separate IMU on top of the GoPro, this gimbal has unrestricted travel and can be run in any orientation.
In the video you can see that as soon as I sped up or dove the camera would hit the stop and eventually freak out, yielding a hilarious view of the duct.

On the bright side, look at that tight tolerance between the prop and the duct!
Other than that I thought the test was great. If I was really filming something I'd have to get way smoother on the yaw stick, but you can see how this thing could really shoot some nice video.
So, this configuration can only be a slow flyer, which is not ideal. The logical thing then is to find a way to mount the gimbal properly, preferably in a way that doesn't require hand catches.

So now things are getting kinda crazy. Pushing the camera out front gives a nice unobstructed view, and lets me hang the gimbal in the right orientation. But it spreads the weight way out, forcing the battery far back to counterbalance the gimbal. And with the weight so spread out, a wider stanced landing gear is needed. This will make pitch and yaw super sluggish, but in this application that may not be the worst thing in the world.

I originally wanted to draw new struts that angle out wider side to side, as well as fore and aft, but this seems like a simpler solution. The rods don't have to be that long, but I didn't want to cut them down since this length works well for top mount applications.
I tested this configuration on my kid on a windy day, and it exhibited some weird flight characteristics, freaking out on yaw. Between the wind and the tight quarters I didn't fly so well, but I did get a few snippets.
Meanwhile, I finally figured out how to get a second operator to work the gimbal. I still hadn’t figured out how to get live video out of the GoPro, so we just did a quick test with Randy working the tilt while looking at the gimbal. I didn’t love how it flew with the gimbal way out front, so for this test I bottom mounted it and we hand launched and caught it.
As you can see, Randy’s operating the gimbal without a video feed, so it’s pretty choppy. He also has control of yaw, but for some reason the Tarot allows rate or angle mode for pitch, but only angle mode for yaw, which makes for an odd combination of controls. So, concept partially proven. It looks like the pilot would control yaw by flying the drone while the second operator would control pitch, maybe tweaking yaw slightly.
Next I had to figure out how to get live video out of the GoPro. I got this HDMI to analog converter from Hobby King. I couldn’t get it to work, and I suspected that it was because the micro plug couldn’t be fully inserted in the GoPro. The only micro HDMI extension I could find was sold on Banggood, where it was sold for $2 with free shipping from China! I ordered it and waited a few weeks, not sure if it’d ever arrive. When it finally arrived, well of course it didn’t fit on the plug.
Sidetracked
Meanwhile, Randy brought me in on a job at an AT&T launch party, shooting selfie videos of partygoers with drones. Since we’d be flying in close proximity to a bunch of drunk people, safety was a major concern. One approach would be to go small, using a Pteromini Split. However, the workflow would be really slow and tedious, requiring someone to download the footage and send it to the partyer.
A much faster approach would be to use the partyer’s own phone in selfie mode., which would eliminate the need to download and send footage. Of course, this means you’d need a bigger, way more dangerous drone. Which means this is the perfect job for…
I made a rail mount for phones, using a GoPro mount screwed into a phone clamp. Randy was really concerned about safety so we looked into wrapping the drone in a mylar balloon for padding. We found a mylar supplier, which, and I kid you not, is called fluffyscardale, who referred us to a forum page where people discussed how they made their own custom balloons. That forum was…rcgroups. We found Steven Gutierrez from the forum and commissioned the balloon.

All along I’d resisted Randy’s push for balloons, ‘cause I didn’t want to junk up my beautiful baby. My opinion changed once we slipped it on–it actually looked kinda cool! It also did some strange stuff. It suctioned to the floor on takeoff, but once the drone was up the balloon shifted up and pushed against the lips of the ducts. I’m not sure why it sucked downwards on takeoff, but the upward shift in flight was literally proof that the lips of ducts provide lift. Air was accelerated over the balloon as it curved into the ducts, creating a low pressure area which lifted the balloon up against the ducts. You can see it straining upwards in the video:
Unfortunately I punctured the balloon while adjusting it, most likely against one of the mounting tabs. Still, we had our proof of concept so we moved on to lighting it up and making it look cool. I’ve never installed led’s and I didn’t feel like learning, so we brought Clint Hild in to wire them up. Clint did a great job, and was even able to match the new company’s logo color.

We did a walk through of the venue with the client and party planners about a month out, and we came to the conclusion that we’d be able to control the crowd well enough that safety wasn’t as big an issue as we anticipated. Randy put the kibosh on the balloon so the drone could look its best, and in a total role reversal I felt bad. I hadn’t figured on the balloon becoming a giant duct lip, which made it kinda cool in my book. Finally, Randy decided that the phone should be mounted in the back, so the pilot could stand next to the subjects while flying LOS. This unnatural orientation led to a few crashes.
Sidetracked a Second Time
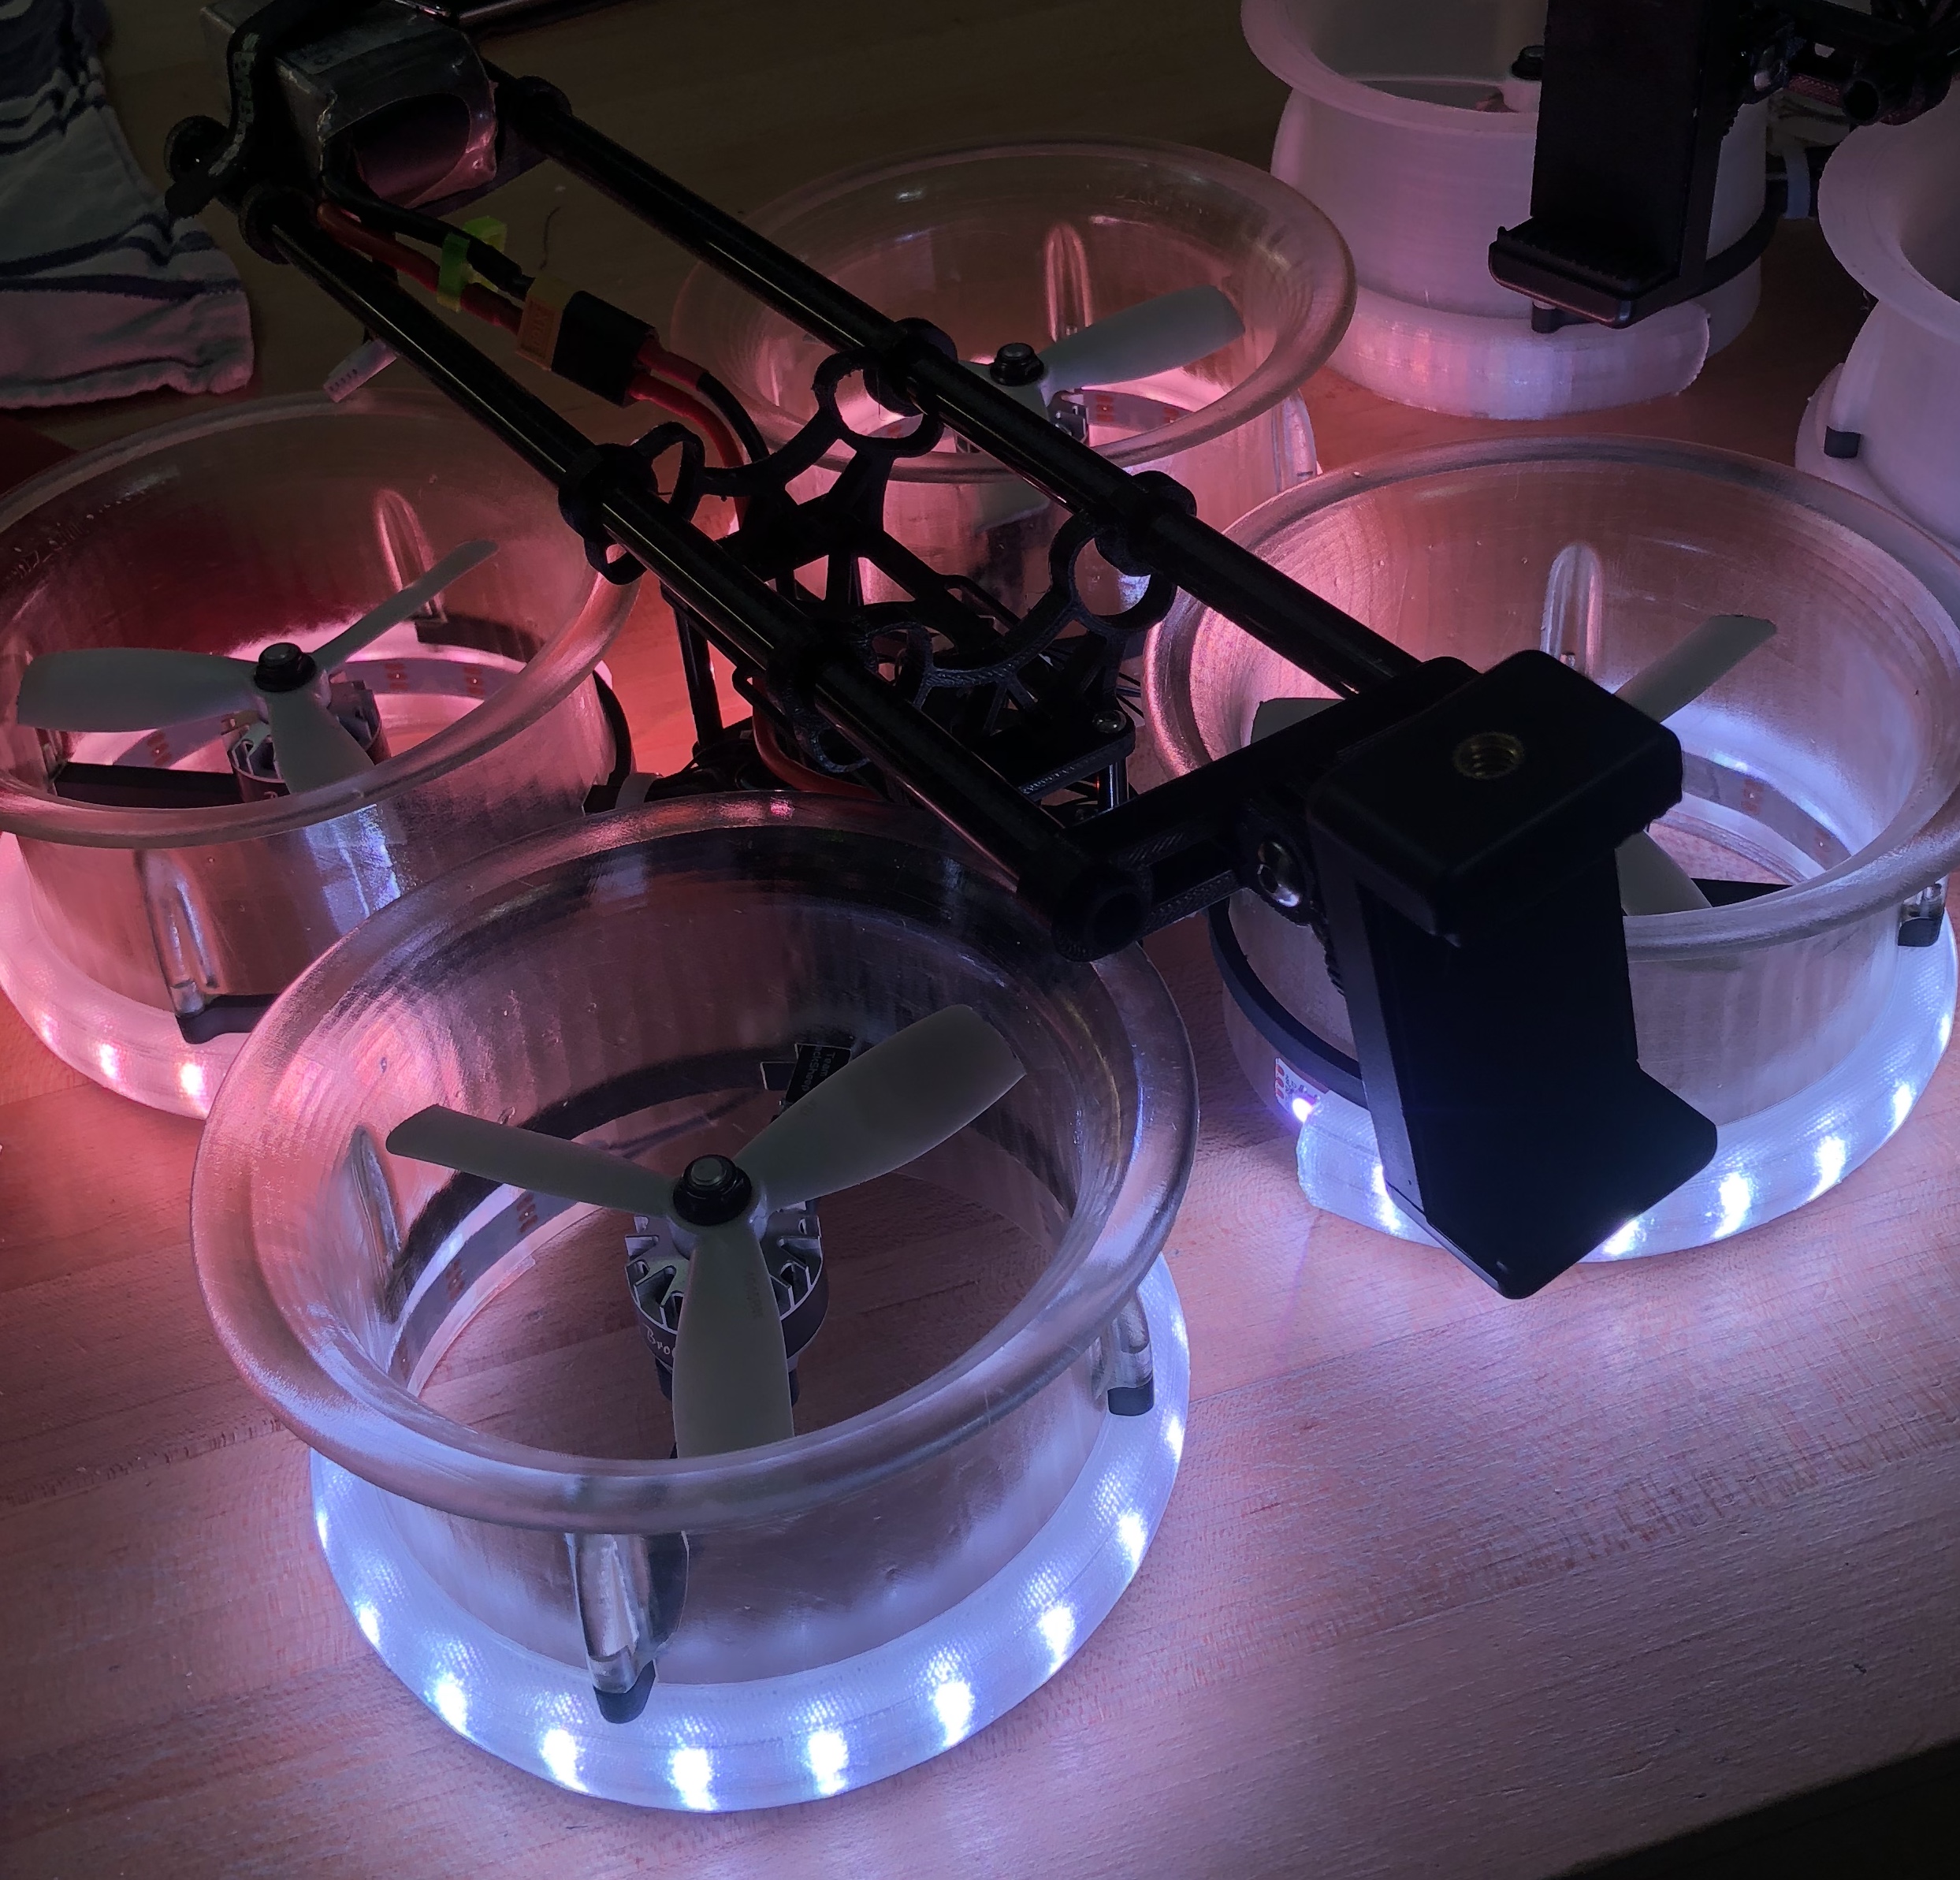
You might’ve noticed some cool looking clear ducts in the pic above. Here’s the deal.
‘They’ say that ducts can double your thrust, but I only get about 25% more. I couldn’t help but wonder if a duct-specific prop or perfectly smooth ducts would improve that number. I started looking at the SLA printer Form2 for two reasons: one, you can print functioning props, and two, SLA resolution is way higher, and you can sand the parts. I ended up getting one, and started testing.

That’s an SLA prop exploding an SLA duct.
Props are an ongoing and frightening experiment, but I was able to do a side by side thrust test of an SLA duct vs an FDM nylon duct, and the SLA duct was…less than 1% better! Well, at least I can print pretty party drones in the time being.
Back to Our Previously Scheduled Sidetrack
We had two stations at the party. Randy hired Brian Walk of BFD Systems and Lincoln Black of S3 to fly the drones, with Clint doing support. I built four drones, two with nylon ducts and two with clear SLA ducts. The plan was to use the beautiful clear drones, with the nylon ones serving as backups. But the clear SLA resin proved to be a terrible material for drones, with the ducts cracking on soft landings on concrete floors. We ended up with one clear drone and three nylon ones. I extended the tpu led covers on the z axis so they extended beyond the ducts a few millimeters and they worked as shock absorbing landing gear.
We showed up three hours before the event and did some last minute tuning. Brian and Lincoln got acclimated and were able to plot out nice flight paths to make the selfie videos more interesting. I’d been using the regular camera on my phone for testing, but Brian suggested using the selfie camera instead. He could use the live video to frame the shot, and the partygoers could see themselves and ham it up. That turned out to be a great idea. Finally, Randy got the crew sweet flight suits and they looked totally pro.

I was worried that the videos would be lame, with people standing still while the drone shot them. Luckily I couldn’t be more wrong, as you can see:
By the end of the night we’d all gotten so comfortable that Randy and I were flying them over the dance floor. Here Randy flies the clear drone over to shoot his wife, the DJ Hesta Prynn. There’s really something to be said for the safe and secure feeling of flying a full shrouded drone.
We also put Randy’s new Hero7 on one (it fits in the phone mount just fine!) as he flew it over the dance floor. We’d worked really hard to get clean video from these drones with damping rail mounts. I love that you can design and print vibration dampeners like those rubber balls we used use. The thickness of those little arcs was critical, a .2mm difference either way made it too floppy or too stiff.

Here’s Randy flying it. If you look carefully you can see some vibes when throttle is applied, but overall it’s pretty damn good for a jury rigged setup. Also interesting is that the placement of the Hero and the loudness of the music makes for that rare drone video where audio is actually useful. I think it’s hilarious that we went from making a super safe air cushioned safety drone to just flying the bare frame over a dance floor. Still, you can see me trying to stay under it in case it did fall.
Side note: Randy lost the Hero and all its footage on the night of the party. We were lamenting the loss of all the drone and hand held footage he took but it magically appeared on the client’s desk a week later with no explanation!
To be continued…