
Ichabod Jr
Gab707, inspirer of the Ichabod, messaged me with a request. He was shooting inside cramped forest canopies for Nat Geo, and he wanted something smaller and more agile than Ichy, for 5 instead of 6” props. I said why not use Gordo, and he said he wanted something with no props in view with no camera tilt. I said why not use Squirt, and he said it might be windy and Squirt doesn’t handle wind well. So I said ok ok let’s do it.
Gab’s first idea was to mount the fpv cam to the face of the GoPro. The fpv cam sits to the side of the GoPro on Ichy, which forces the front props farther apart. Narrowing the two cams would make the frame substantially tighter. He also suggested pivoting the camera through its cg. This would do a couple things: keep the camera cluster from changing angle when jarred, and keep the overall cg of the quad constant on angle changes. This, however, would require a complicated mount that widens the cluster, so I suggested pivoting it near the mid point at the back of the camera instead.
Gab likes the solidity of Ichy’s 10x10mm arms, he gets no vibes in his video no matter how much throttle he gives it. I thought 8x8 would be good here since we’re going down to 5” props.
So with those parameters I got to work. The layout was pretty similar to Ichabod, with one slight difference. The bottom plate runs the entire length of the frame. On Ichabod, an 1800 runs from the main body (between the arms) to the tail section, so that the battery, once strapped in, reinforces the middle plate. On Junior, a 1300 would be entirely on the tail section, so its momentum could snap a single plate in a crash.
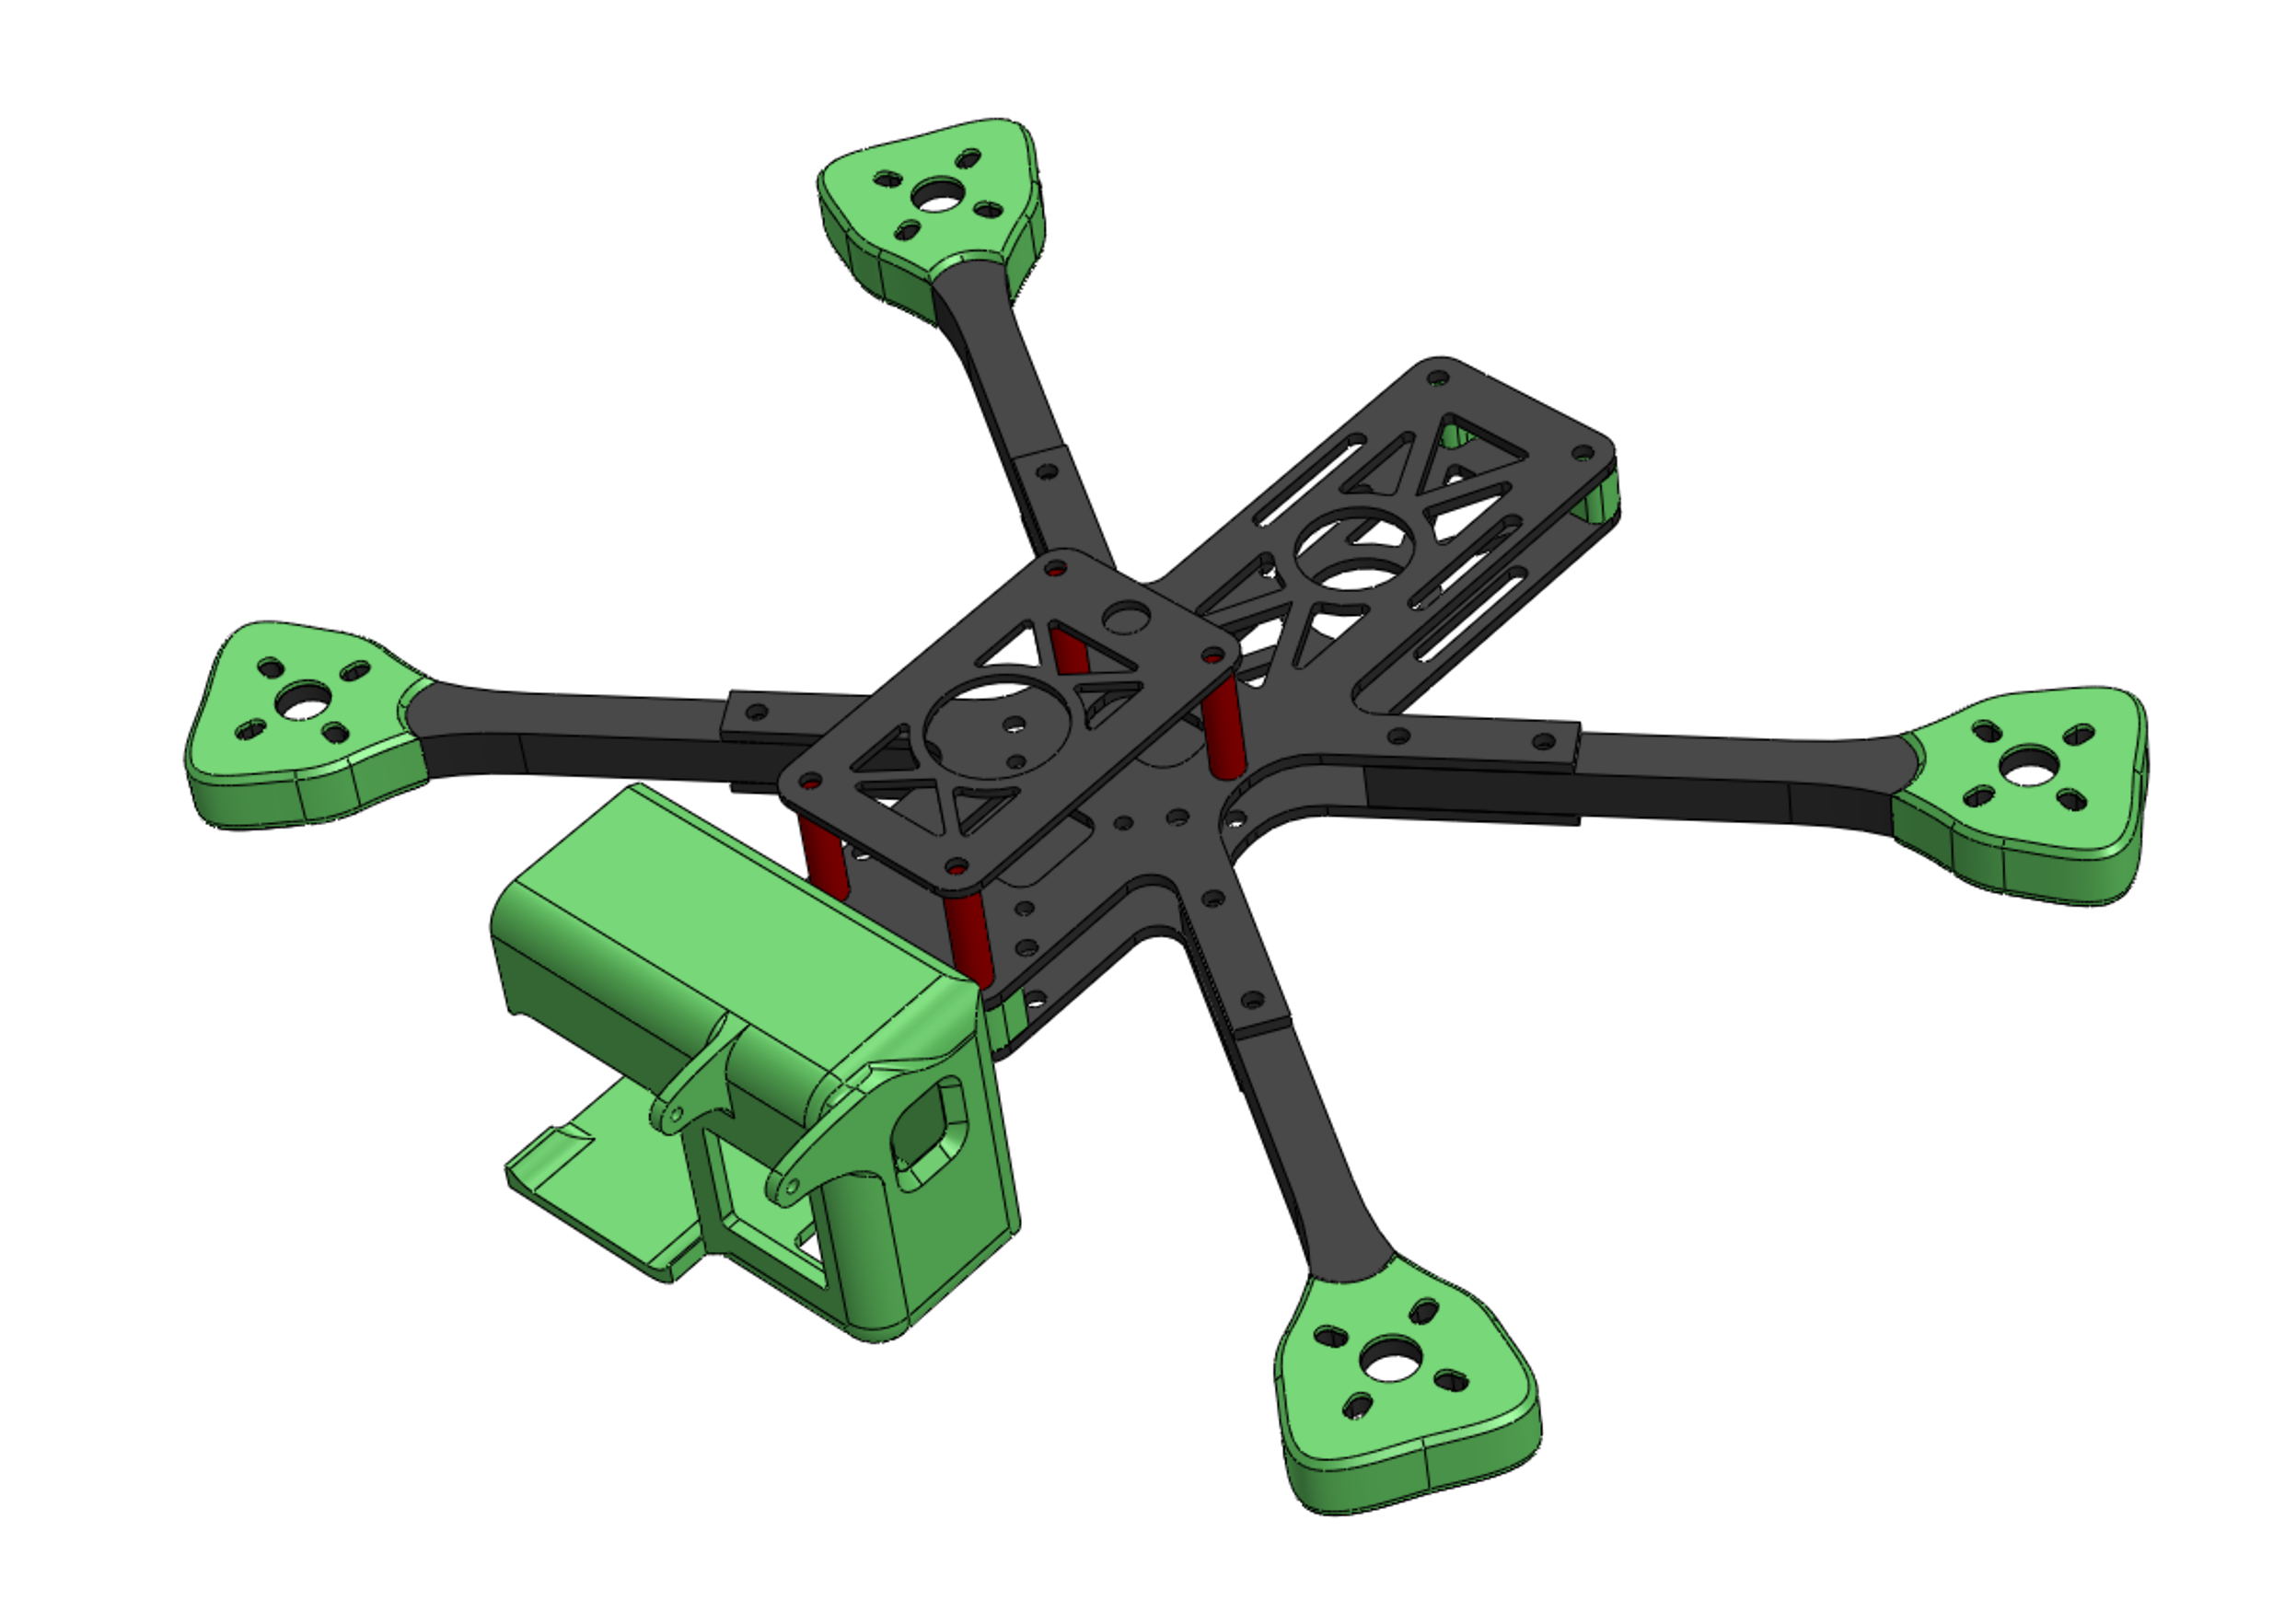
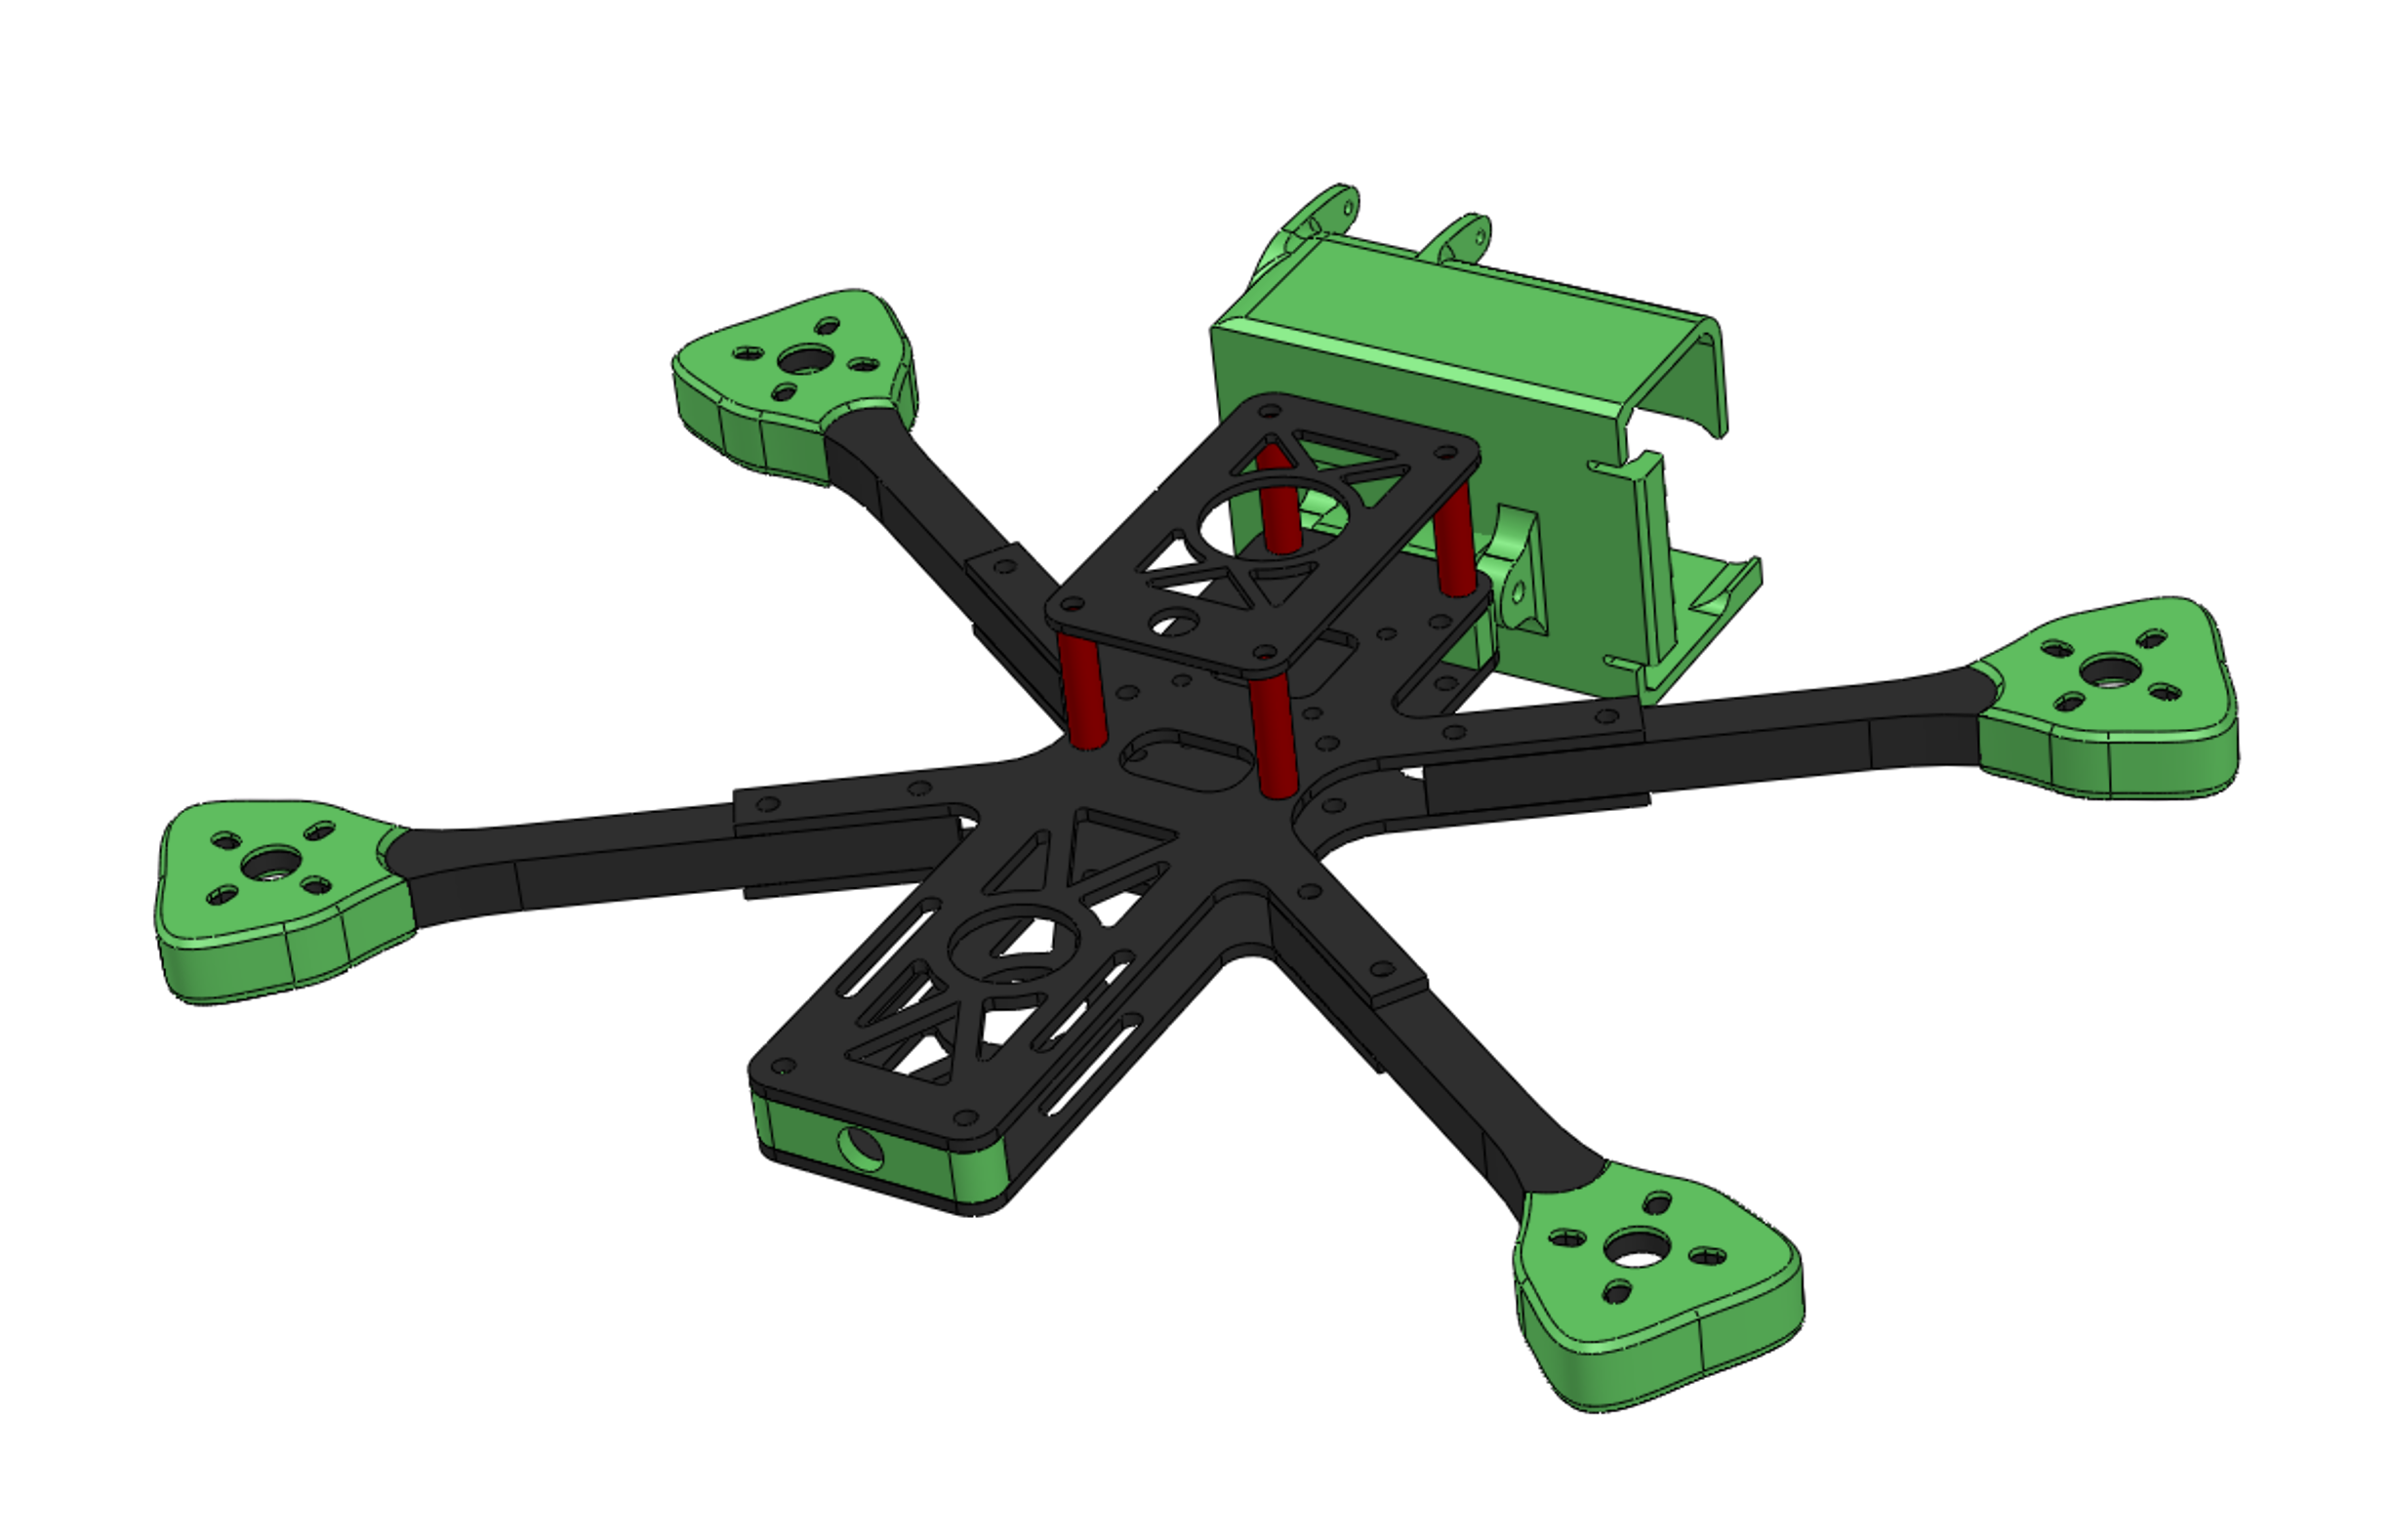
I put a hole in the butt, because butts have holes. No, it’s for an SMA in case you want to tuck the vtx between the body plates. There’s another on the top plate. The 8mm arms are milled out to 3mm under the motors, so you can use the 5mm screws that come with motors (and I won’t have to pack 16 motor screws with each frame).
Ichabod uses a big ol’ m5 to lock down the camera. Here, with a smaller frame, I wanted to try something lighter. This mount has a m3x30 standoff inserted in the holder. The standoff protrudes from either side of the holder and gets recessed in the cam mount. m3’s screw in from either side. It took a few iterations to get a configuration that held the cam angle firmly. m3’s with big socket heads instead of button heads helped as well.

The carbon arrived while Gab was moving, so I wasn’t able to get one to him right away. I built one myself and sent one to Nurk. Nurk quickly pointed out that the fpv cam was in the fov in 4:3. I only tested it in 16:9, doh! We both flew them and found that it flew nicely, which is a total shocker since it’s…a quad. Mine felt particularly dreamy, but I’m sure it had more to do with the brand new components than anything else.

Props are reversed to keep grass juice off the lenses.
I tried flying it with almost no tilt at Squirt speeds. Squirt still does slow better, the drag of the ducts just keeps it nice and steady. Even with almost no tilt Ichy Jr still wants to speed up. Of course, if it was windy, there’d be no competition.
Then I flew it at about 30 degrees of tilt:
So, you know, no big whup. It’s a quad, it fly good like most quads. The differentiating features are no props in view through a wide range of cam angles, rock solid 8mm square arms for smooth video, and skinny arm efficiency.
Meanwhile, Nurk took his on a job and worked on this (it’s the fpv quad in all but one shot).
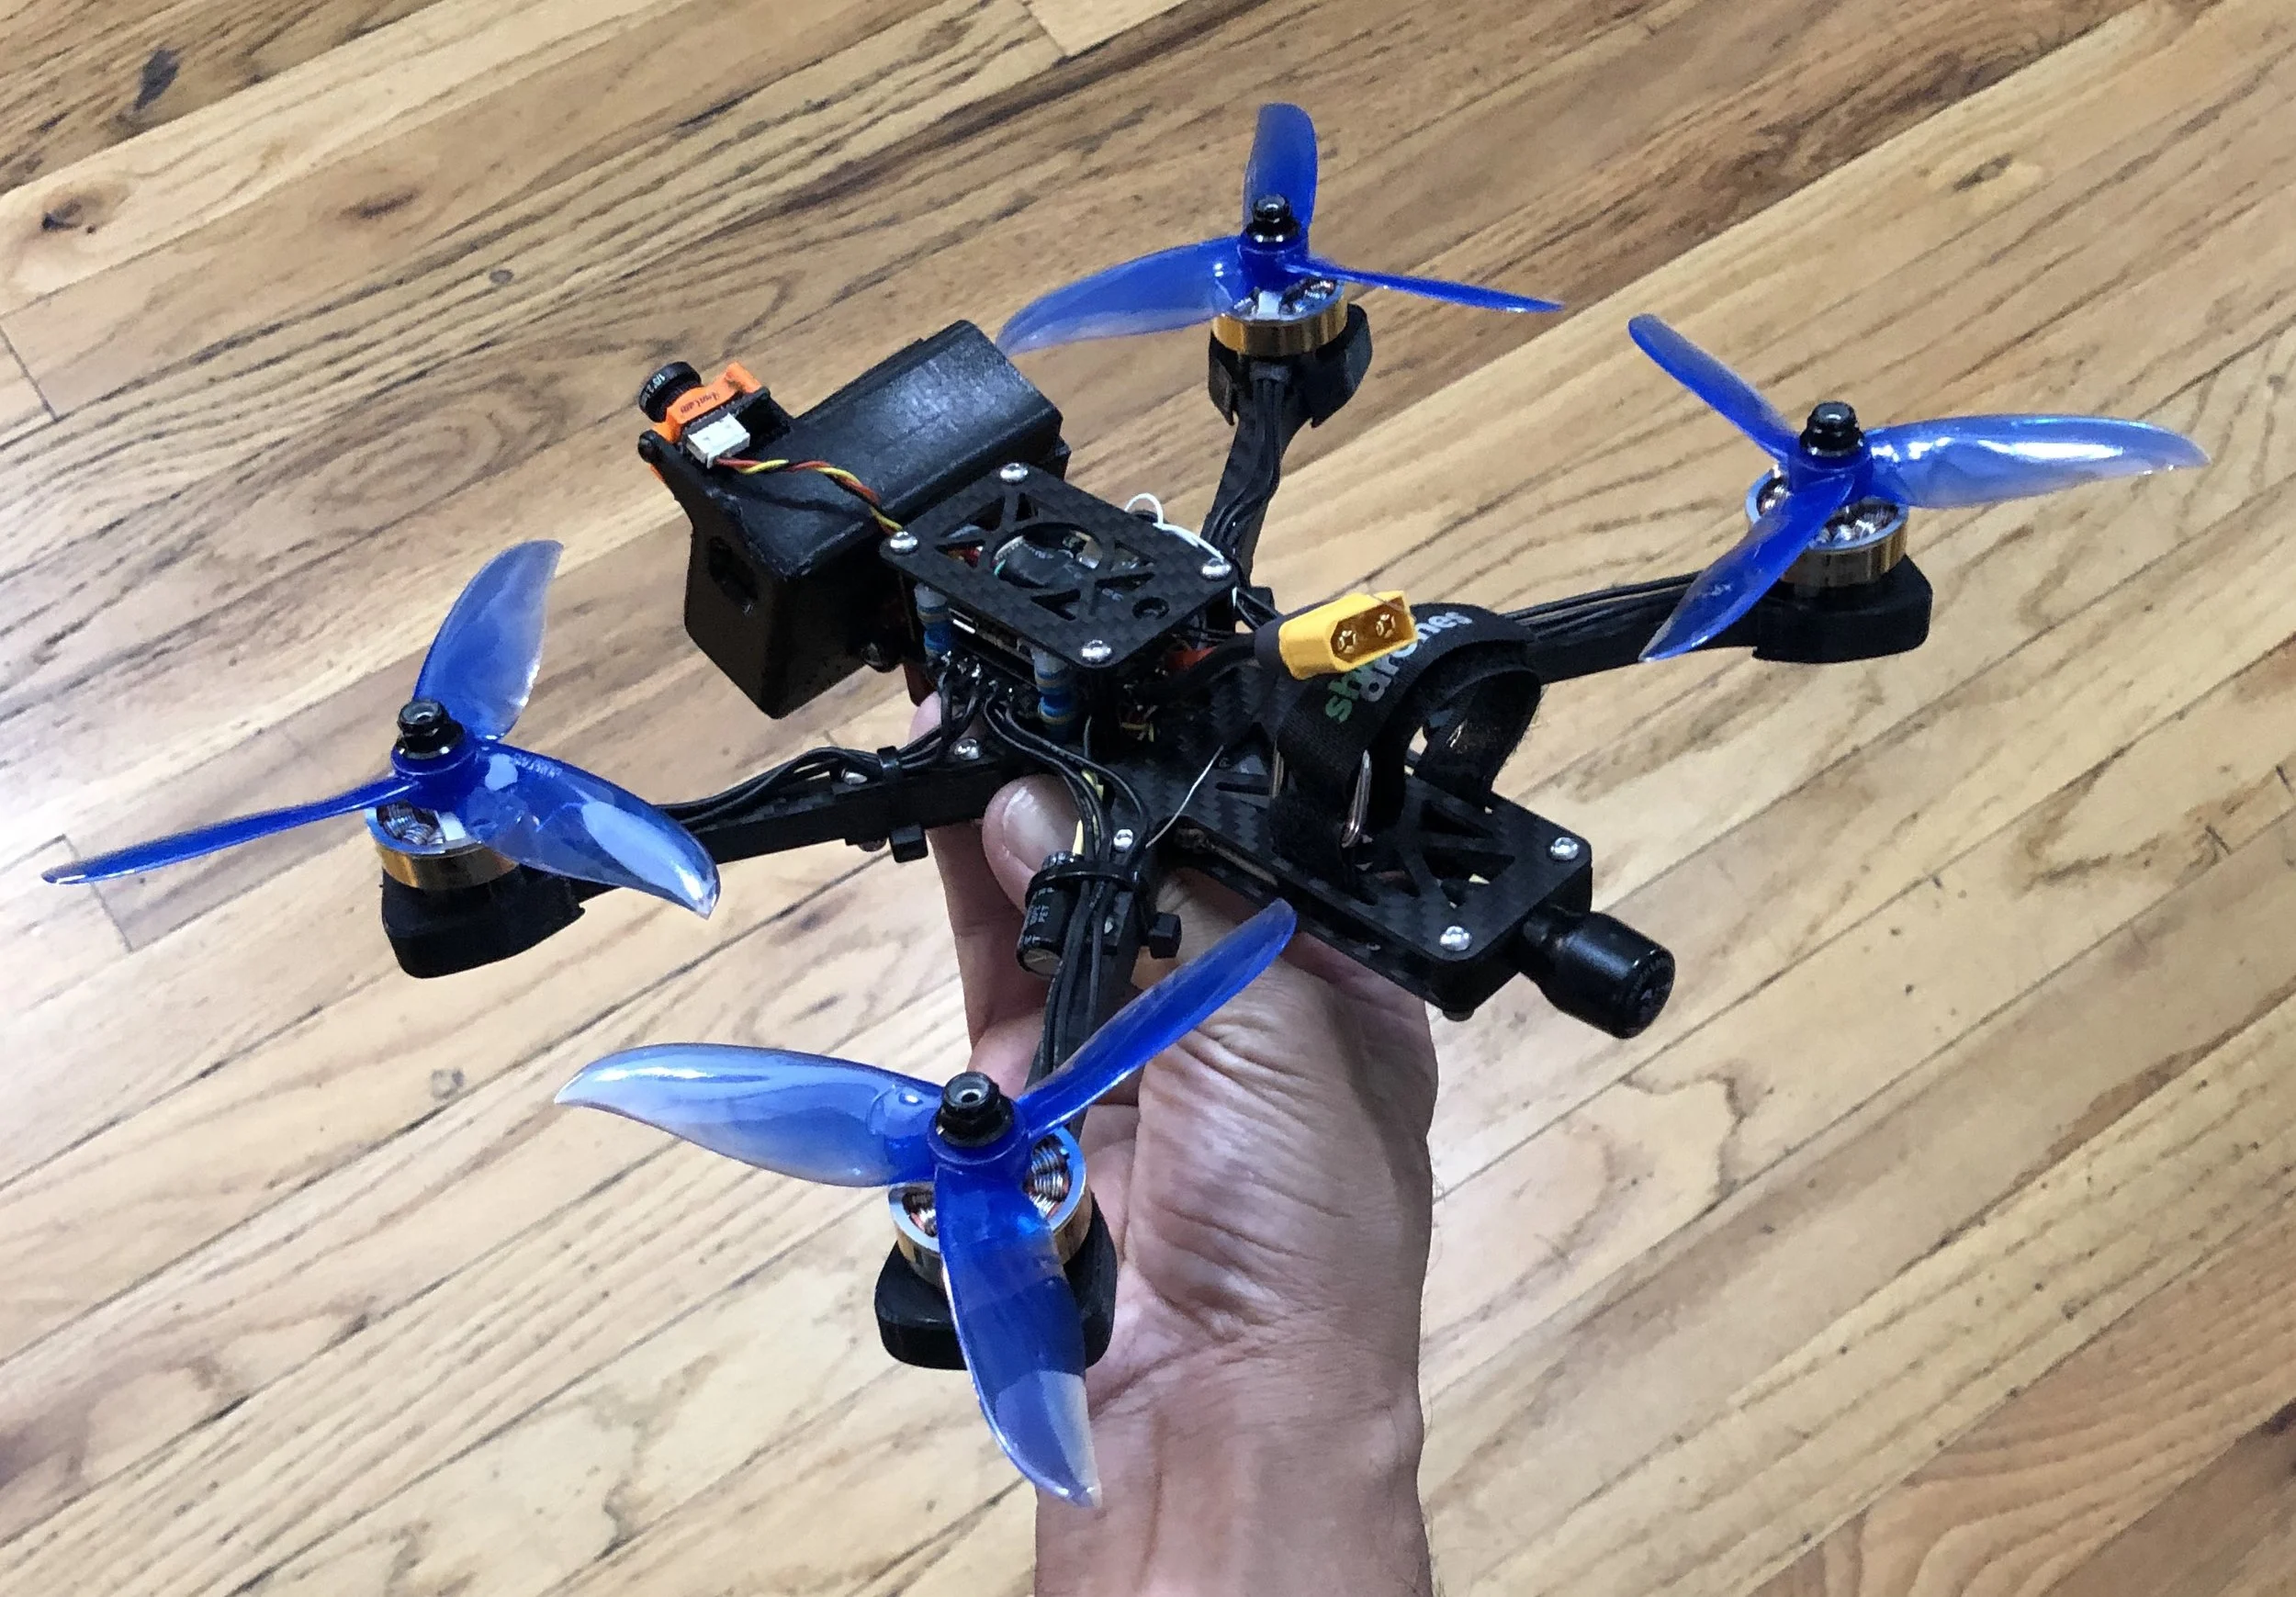
I moved the fpv cam to the top, and made it a simple press fit for more protection. This takes it out of the fov no matter the aspect ratio.

Gab came to town to visit DRL headquarters and I was finally able to get him his frame. He immediately took it to Japan for a snowboard shoot (I love that Ichy Jr has worked twice already). He had a particularly unique use case for it.
Gab wanted to get close follow footage on a snowboarder, which seems like a simple enough task. But at the steep angles they descend at, a quad, with even 0 cam tilt, will be too fast to stay behind the snowboarder. The only way to frame the subject without overtaking it is to fly with negative cam tilt.
I found this incredibly cool, because I had inadvertently made the one frame (afaik) that could do this. Sadly Gab isn’t in control of the footage, so we’ll have to wait ‘til it’s released by the production company.
Now, it’s one thing to track a snowboarder downhill, but flying back up the hill with negative cam tilt was super dicey for Gab. We’ll explore a servo tilt mechanism next, so he can tilt the cameras up for the flight back.
Gab also used the rear antenna mount, and he found that in the tight 8mm space the sma was shorting with the frame and smearing his video. Some electrical tape fixed it. I haven’t experienced this myself, but it’d be something to look out for.
Nurk’s business partner Winston (aka Flying Francis) built one as well, and check out his cool wire routing.


And then…
I got to spend 5 days with Gab on a shoot for Yeah Drones, and I got to see firsthand how he uses Ichy Jr. Gab tweaks cam tilt constantly to suit the needs of a particular shot, and Ichy Jr.’s mount turned out to be particularly convenient – all you have to do is grab it and move it, no need for tools or another cam mount, and no need to match the fpv cam angle to the hd cam. In fact, Gab is so particular about framing the shot he had Brainfpv add framing lines to his osd.

I thought negative cam tilt was a really weird and rare use case, but Gab needed it a couple times on our shoot. Seeing Gab work in person, and seeing how much he fine tunes cam tilt, really emphasized the need for a servo. As easy is Ichy Jr.’s cam mount is to use, you still have to land it to change it.
We wondered if the servo, with Reelsteady, could ever be smooth enough to use during a shot, rather than between shots. And we thought it’d be really funny to have it operated by the head tracker in your Fatshark. It’d be really cool to learn to fly in angle mode while tilting the cameras up and down – with the cams de-coupled from the frame you’d have to trust the position of the stick as the attitude of the drone. That’s be some next level fpv’ing.
When I got home I whipped up a cam mount on 5mm bearings, and added a servo horn to the back. Then I raised the standoffs from 20mm to 40mm, and drew up a tpu servo mount. Ideally the servo mount would be carbon, but first we need to settle on a servo and size the cutout accordingly. I sent the parts to Gab, and we’ll see how testing goes.

Meanwhile… (2/21/19)
While we mess with the servo version, I have a small run of the standard version here, with more to come next week.
But Wait There’s More (3/19/19)
Gab wanted a vertical Immortal T mount. Most people mount their Immortal T’s horizontally because it’s convenient and easy, but it’s not the ideal orientation. Ichy Jr has a cam mount that protrudes below the bottom of the frame, so it has more vertical clearance than most frames. This makes it easier to make an mount where the antenna won’t touch the ground on landing. Gab found a design on Thingiverse that slips over a standoff, but I thought I could make something better and more specific to Ichy, without impinging on the space around the fc stack.
I came up with this, a slide-in design that screws on to the top plate and lets you pop the antenna out for transport. It took several tries to get the internal diameter just right, so it holds tight enough while still making it possible to slide the antenna in and out.

It worked well enough, but one thing was eating at me. The center section (circled in red) needs supports to print and at this tiny scale it comes out messy. I could make a big fillet to smooth the transition and make the overhang less than 45 degrees, or I could arc the gusset out so that it meets that section at its lowest point.
This turned out to be harder than expected. My first attempt was a filled surface defined by some 3d sketches. For mysterious Solidworks reasons that gusset wouldn’t intersect with the main part, so I tried another way.

I started with and extruded surface, which is then thickened. It’s not merged with the main part yet.

Then it’s trimmed.

Then it’s intersected with the main part, where the excess parts are eliminated. Then fillets are added for strength. I’m always surprised at how much of a PITA these little parts can be, though it’s super gratifying to make a nice one.
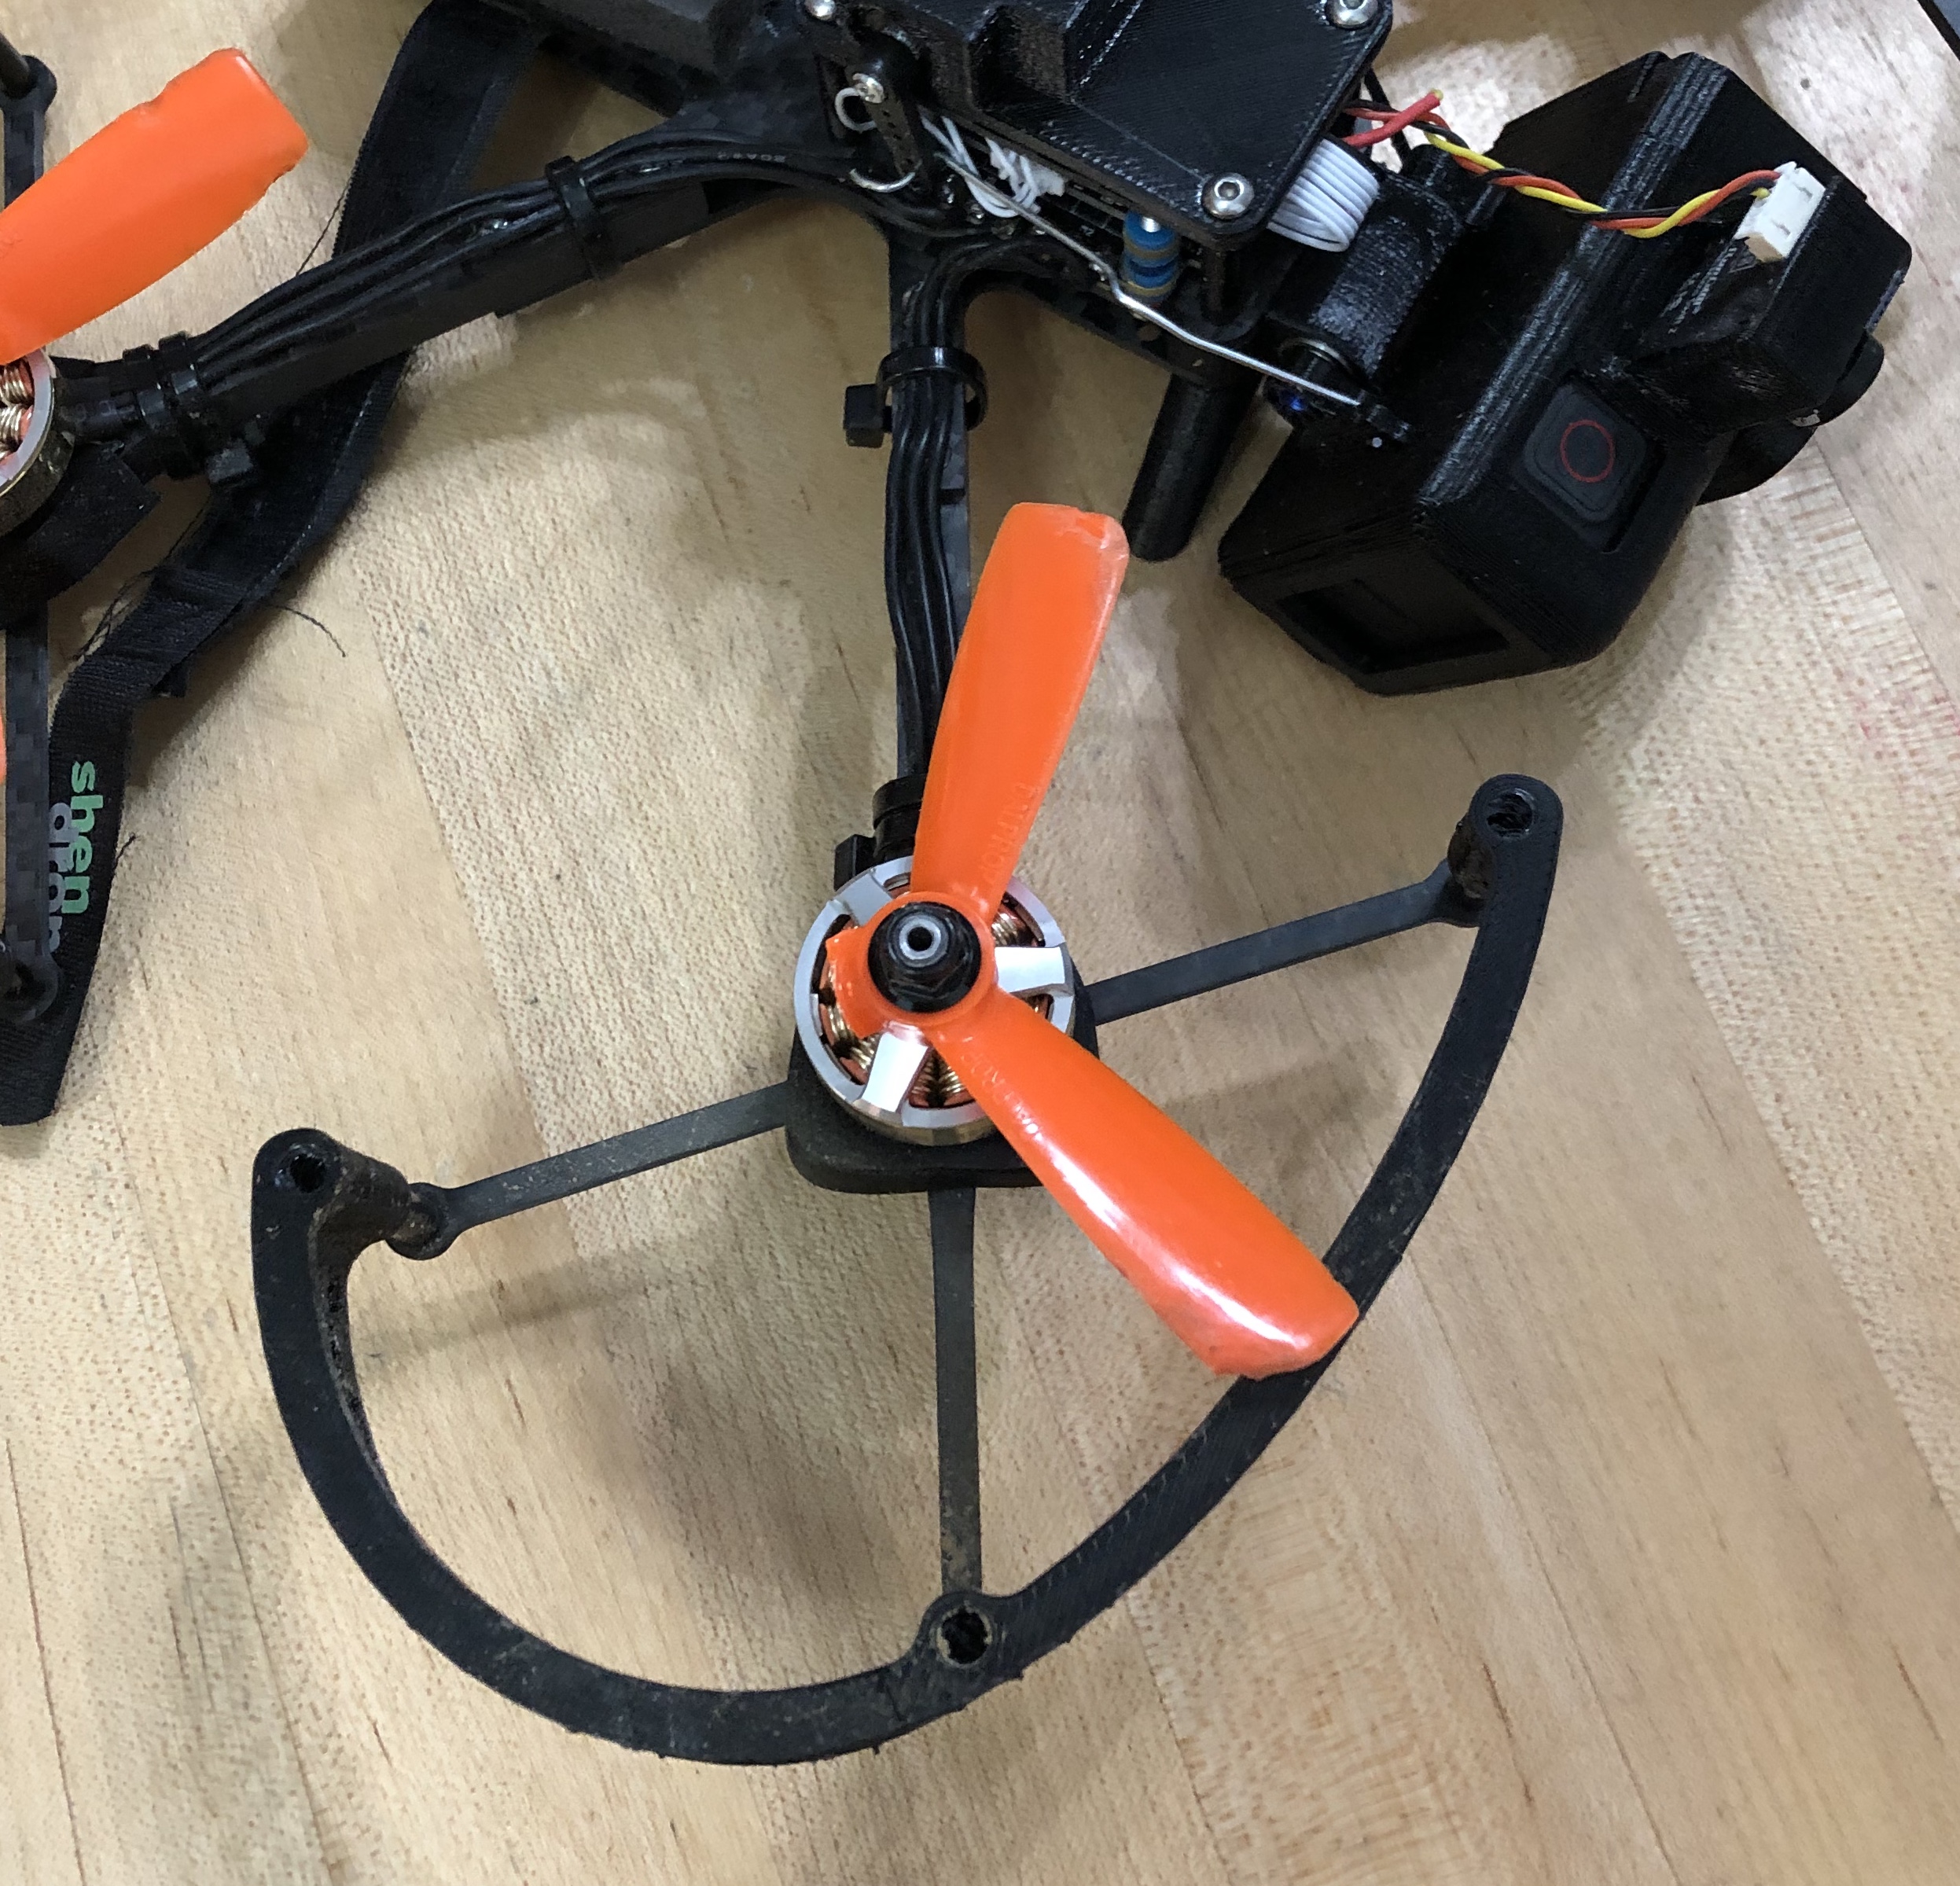
Gab also wanted prop guards so that Ichy could do Squirt-like indoor stuff. The idea is to make 5” diameter guards and run 4” props. There’s a few ways you could go here, one being two pieces of carbon bolted together with standoffs, with the bottom piece sandwiched between the motor and the arm, a la the old QAV250 prop guards. This would totally work, but it’d be a time consuming change, an 8-16 screw operation. Plus, you’d need to have longer screws on hand for the switch.
Ichy’s arms have a big ol’ milled out hole at the bottom which could be used as part of the mount. A plug can go into that hole, with an extension zip tied to the arm. This could be a carbon and standoffs assembly, or fully 3d printed. I drew up a fully printed version as a proof of concept.

The holes were a fun challenge.

I took it out and instantly discovered a rather huge flaw in my concept.
Well, at least there was some good news. The holes worked like perforations and made for super clean cuts! I think it’s hilarious that I got so caught up in designing a cool part I lost sight of the simplest fundamental needs of the part, like non-disintegrating-ness.

Prop Guards Cont’d (4/3/19)
So the concept is basically sound: a relatively quick change prop guard that makes Ichy Jr more versatile on the job. Now to do it properly with carbon. Gab and I decided that it needed 180 degrees of coverage, so I drew this up:

This looks super safe but proved to be way too heavy.

So I chopped off the bottom part and dropped 10 grams.
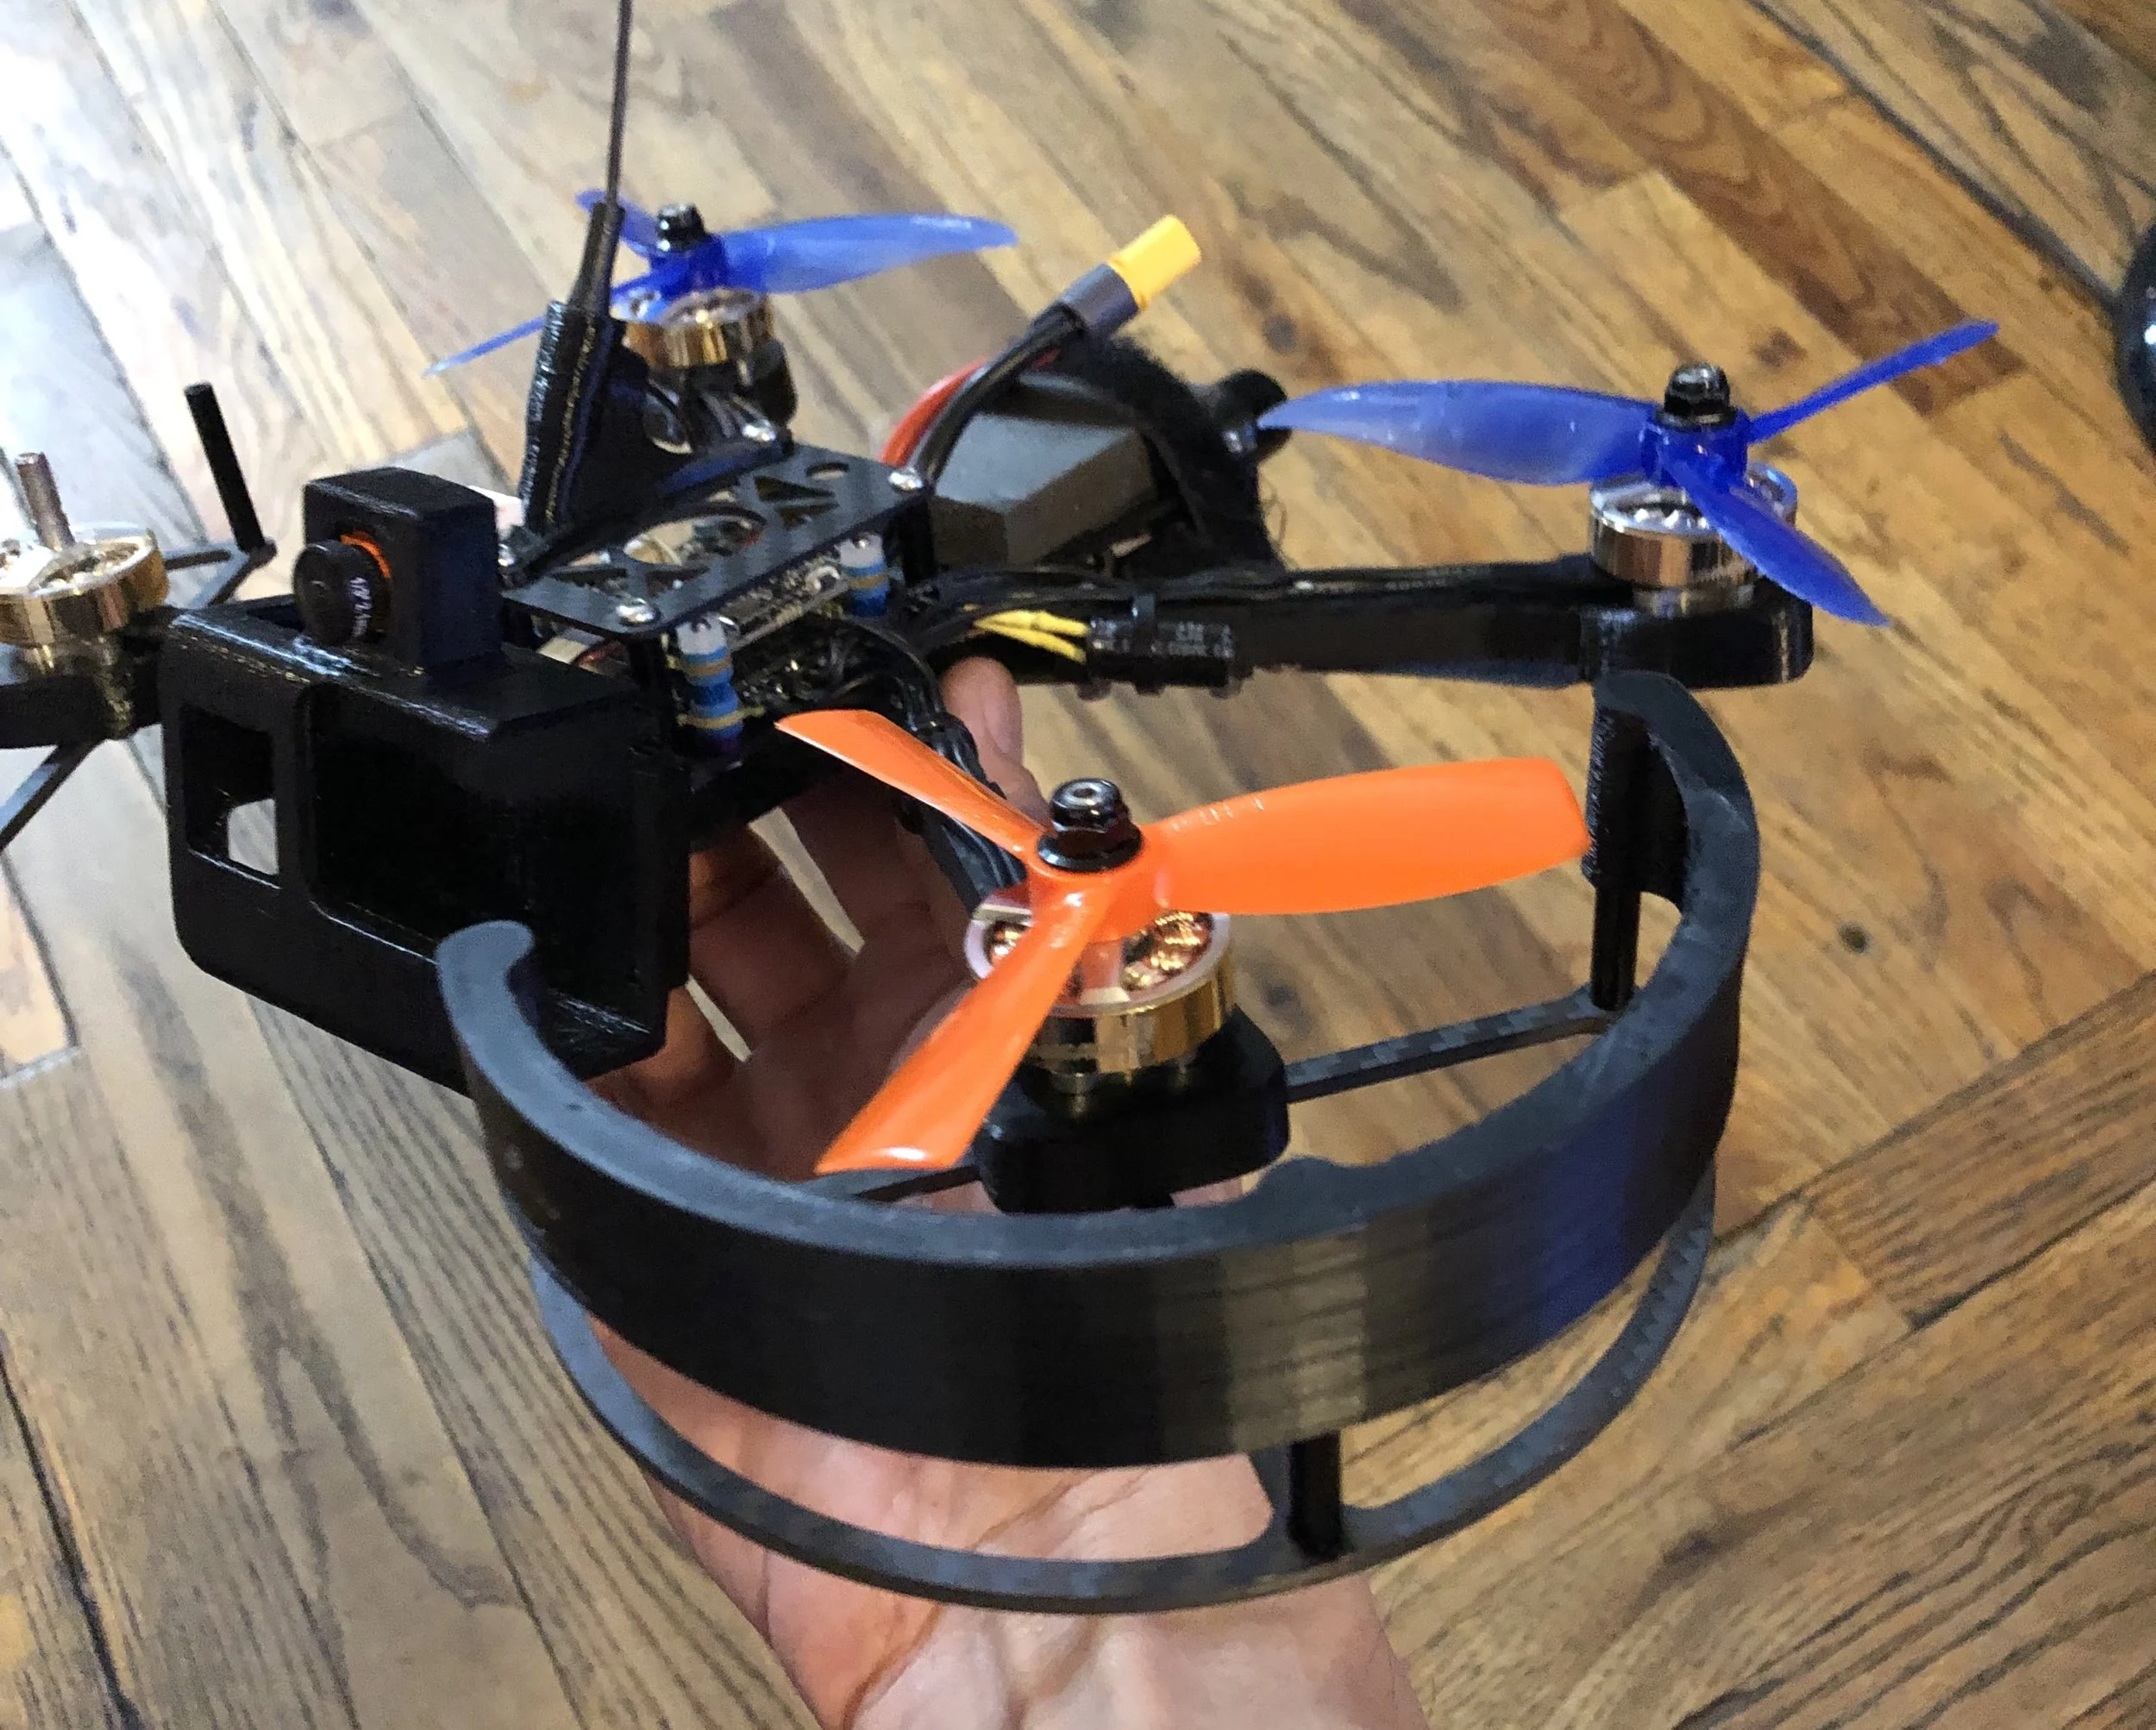

It looks so huge but it takes up the same amount of room as a 5” setup.
I gave put it on even more of a diet and got it down to 26 grams.

I took it out for some wall taps and it performed as expected. Here’s some super boring video for proof.
But we’re not out of the woods yet. Carbon parts are priced by how their area, and this one takes up a lot of square footage. Each of them would have to retail around $14, which would’ve made a set of four complete assemblies as expensive as a frame. I suppose someone might want them no matter what cost but on principle it’s just wrong. So I came up with this:

Broken down in two pieces there’s almost no waste, and now they’re more like $3 retail, so a ‘print your own’ option would be $12. Much more reasonable!
Back to the Servo (4/15/19)
Gab is extremely precise with his camera tilt so it was no surprise that he really liked flying with a servo. This is how he describes the workflow on a recent Shredbots shoot: he flies out to the snowboarders, and they wave to him and point to the jump they’re about to hit. He checks out the line, and remotely sets the cam tilt he’ll need for the shot, and they go right away, no need to speak in person or land and set the camera by hand. And once he grabs the shot he can instantly reset the cam tilt for another shot, or to fly back and land.
I wasn’t totally satisfied with my original solution. It required super long 40mm standoffs and would need a whole new top plate. It also puts the pushrod right on top of the FC, and Gab was worried that it would short or damage the FC. So I came up with a new solution, with the servo on top of the top plate and the servo arm protruding out the side. This is cleaner, stronger, and an easier retrofit. At Gab’s suggestion I also added a landing gear to protect the servo from impacts on landing. You can use just one in front, or two to takeoff/land level. Finally, I integrated it with the Immortal T mount so it’s just one do-it-all piece.
That’s right, it’s a land crawler too. MOST VERSATILE QUAD EVER.
More Updating (4/24/19)
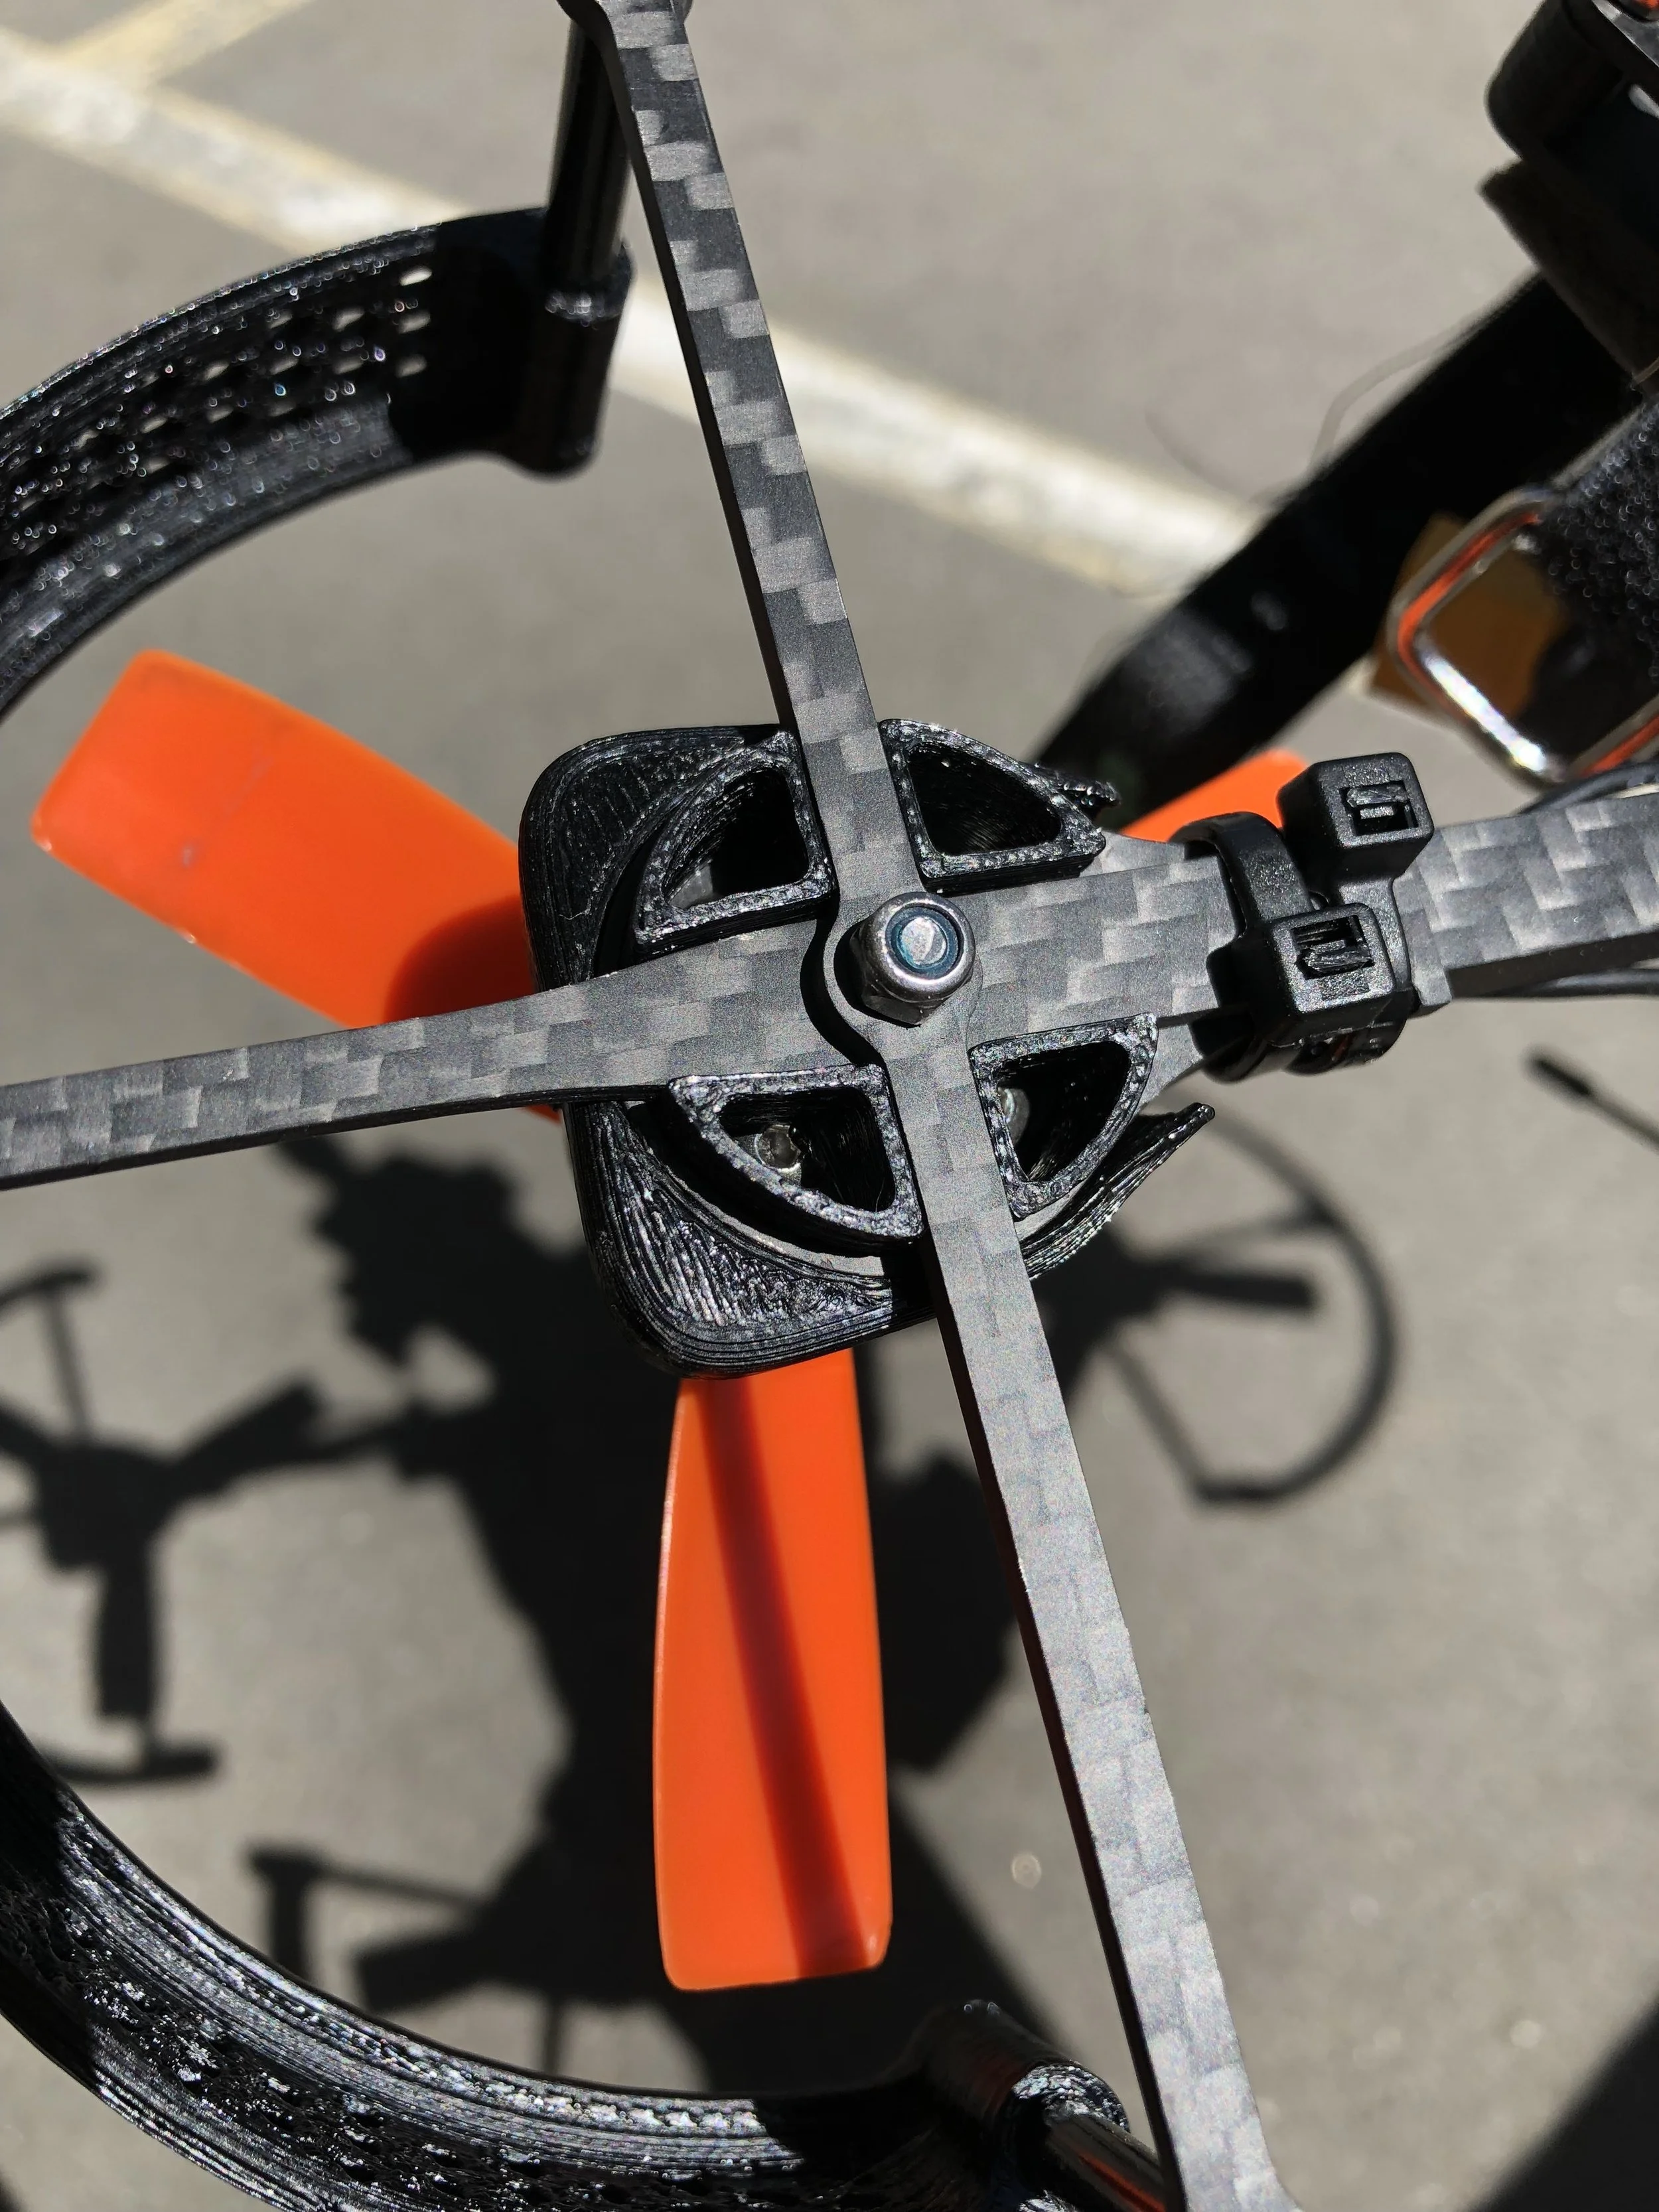
The new prop guards came in, and I quickly discovered a flaw in my design:
So I added channels to the plug so that the crossbar wouldn’t rotate.
So now it can take some light impacts without collapsing into the props. I’m sure the guards will break if you smash into a wall at speed, but the intent of these is to give you a feeling of safety should you suddenly find a need to fly Ichy slow and tight in close quarters.
As for the servo mount, I was worried about putting a constant strain on the servo, so I added a little ‘spring’ to the nose plug to support the GoPro’s weight.

See that flap under the Hero? That’s the new part. I would’ve cropped this photo closer but I like the way the light comes through the guards on the prop.
1.1
Running changes were made over the course of a year to improve Ichy. I flared out the arms on the body plates to strengthen them. The mid plate was thickened from 2mm to 2.5mm. The recessed cut in the arms was changed from a circle to a + to beef them up. The arms were lengthened a tiny bit inboard, to move the stress point to the thickest part of the arm mounts. Finally, the cam pivot was changed from an M3 standoff to a M4 screw and wide washers.